Table of contents
Chances are you’ve already heard about RAG – Retrieval-Augmented Generation. This technology has taken the industry by storm, and for good reason. The emergence of RAG systems is a natural consequence of the popularity of Large Language Models. They make it easier than ever before to create a chatbot – one deeply entrenched in the domain of your company data. It can provide a natural language interface for all the company information that a user would normally have to dig through heaps of internal documents to get.
This saves so much time! Let’s just consider the possibilities:
- A factory worker could ask what an error code means and how to proceed with it, instead of hopelessly skimming through bulky instruction manuals.
- An office worker could check on any policy without pestering HR.
- A retail worker could see whether specific promotions stack together.
And the list goes on. Why can’t we just use GPT though? Is this ‘RAG’ necessary? Well, there are issues with using LLMs directly in such cases:
- Hallucinations – while LLMs are great at creating plausible sentences, they may not always be factually correct.
- Lack of confidence – LLM by itself won’t be able to confidently declare how it knows what it says, or how the user can confirm it.
- Domain adaptation – Large Language Models are large. Training them in the specifics of what you want them to know is not a task that comes easily or cheaply!
- Domain drift – Let’s say you managed to train a GPT-like model to know everything about your particular use case. What if the underlying data have changed? Do we have to do everything over again?
There are a lot of risks involved in creating a chatbot using LLMs – thankfully, RAG is here to support us. This article focuses on the retrieval component of retrieval-augmented generation – making sure the correct context is fetched from the company documents and passed onto the answer generation stage. It is based on our hands-on experience building multiple commercial RAG systems. We have read a ton of papers, and learned what works well on actual client data and what doesn’t – and we’ve compiled it all for you here in this article!
What is RAG? Retrieval-Augmented Generation explained
I assume I have managed to get your attention by now. You know you can use RAG to anchor a generative model in your company data. Who wouldn’t want a seemingly flawless solution like that? You’re probably still a tad suspicious though. It sounds too good to be true, and you’re not sure how it works. Let’s take care of that!
RAG workflow
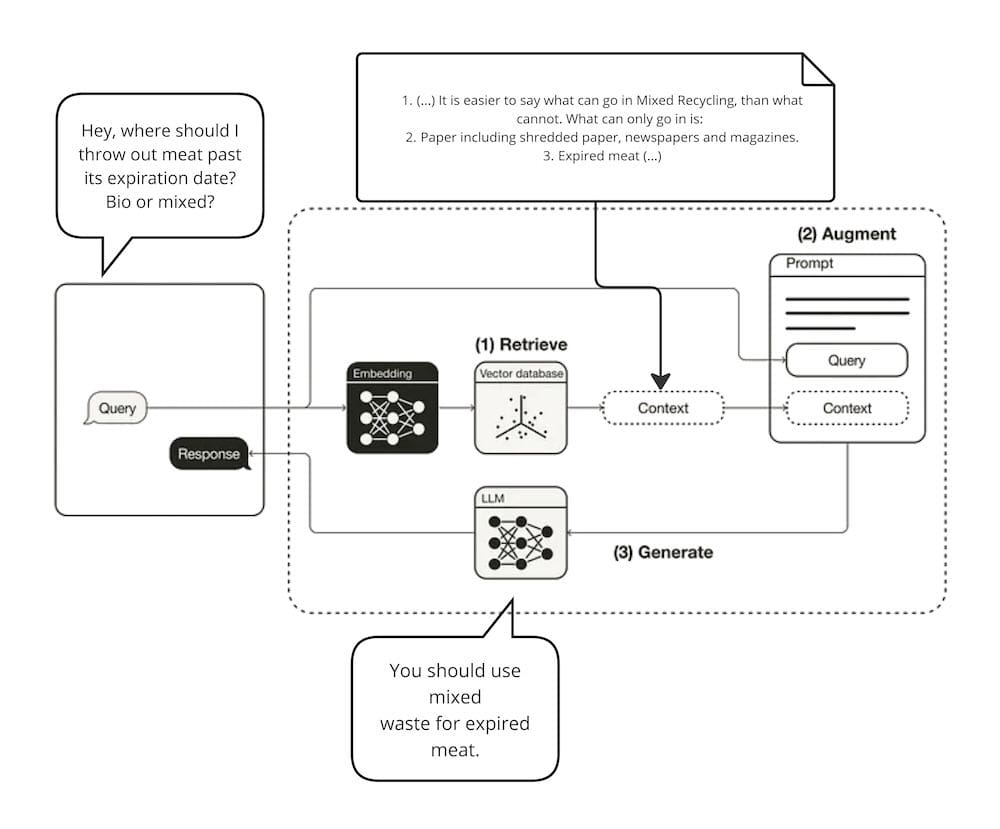
A typical RAG workflow will look like this:
- The user asks a question.
- The question is converted to a numerical representation for convenient processing.
- Pieces of company knowledge similar to the question asked – either semantically, or in terms of keywords – are picked up.
- The relevant text gets packed into the LLM context.
- The LLM is fed the relevant context and user question, and uses it to come up with an accurate answer.
- An exact source and citation are provided for the user, so the truthfulness of the answer can be verified.
After the workflow finishes, the user is equipped with an exact answer to the question and a relevant passage from the internal documents, validating this information.
What are the benefits of the Retrieval-Augmented Generation?
There are multiple benefits of using Retrieval-Augmented Generation compared to alternative methods of creating chatbots anchored in a specific domain. Amongst the most important ones, we can highlight the following:
No training necessary
Before RAG, trying to teach an LLM domain-specific information required fine-tuning. While the Performance Efficient Fine Tuning branch of Machine Learning is growing strongly, training still requires:
- know-how,
- computational resources,
- a lot of data.
Except for some very specific use cases, it’s best avoided altogether. The RAG system does not require any training of the base Generative Model.
Fewer hallucinations
Even assuming someone has managed to fine-tune an LLM correctly, unfortunately, it is still prone to hallucinations. The model can use knowledge built-in during the pretraining to formulate an answer, or it can come up with a plausible-sounding false explanation when lacking data. The RAG system handles hallucinations by providing the model with the exact context it needs to provide a truthful context. The model can be further instructed not to rely on any built-in knowledge if it’s not present in the retrieved context, thus reducing the probability of hallucinations. It’s not possible with a fine-tuned model, as built-in knowledge is all it has.
Dynamic knowledge base
With the RAG system, you can change the knowledge base whenever you feel like it. No repeated training is necessary, nor are any additional steps for that matter. All you need to do to make new knowledge available to the model, or deprecate some previous documentation, is to swap the documents uploaded to the vector database.
Citations
The RAG system structure makes it possible to return sources and citations for the information returned by the model. It allows the user to validate any answer received, and check the wider context in the linked company documents.
Building retrieval for your RAG system
Now that we know how retrieval-augmented generation is supposed to work, and what it’s good at, let’s see how to build one. Note that everything we talk about here has been field-tested – this is knowledge based on actual commercial projects delivered by deepsense.ai!
Embeddings & Vector databases
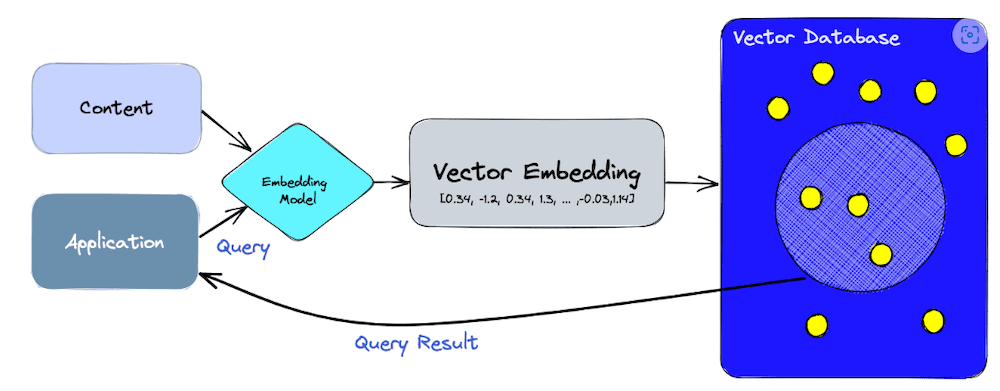
The first thing you need to do when building an RAG system is to convert your documents to their vector representations and store them somewhere.
Embeddings
Embedding encapsulates the meaning of a sentence inside a numeric vector. It allows for further operations, like a similarity search. To create embedding vectors, we use sentence-embedding models. There are multiple models available, and a good place to start selection is a leaderboard. When making your choice, be sure to check the following model parameters:
- Does it support the language you’re interested in?
- Is the context size suitable for your needs? How large of a chunk do you need to embed at once?
- Will you need to threshold retrieval results based on similarity scores? Some models are not suitable for thresholding, because of the resulting tendency of embeddings to always score highly on similarity.
Text splitters
A whole document will rarely fit inside an embedding model. The text needs to be split into digestible chunks, no larger than the embedding model’s maximum supported context. A text splitter will help separate the text into smaller, hopefully semantically homogenous chunks.
Splitting by character

The simplest text splitter is the character-based one. You need to define a separator – typically an empty string will work just fine, and the chunk is populated letter by letter until it reaches the maximum chunk size. You can opt for chunk overlap, where there are a couple of common letters between adjacent chunks. It’s typically a good idea to do so, because otherwise you risk splitting a sentence in an awkward place, losing the semantic meaning in either chunk. This solution leaves much to be desired – a perfect chunk encapsulates a singular idea to make retrieval easier and the content leaner. We should find a way to maximize the probability of getting correct splits. That’s where recursive text splitters enter the stage.
Splitting recursively

Recursive text splitters let you define a number of separators in a specific order. This way, you are able to express an intended hierarchy. For example in the langchain implementation (available here) the default separators are [“nn”, “n”, ” “, “”] – splitting by paragraphs, newlines, spaces, and with no alternatives left, on an empty string. Prioritizing splitting into paragraphs makes it less likely to break a coherent thought into separate chunks. If the documents you’re working with have some specific structure like markdown or html – even better! You can use the knowledge about the format to come up with a better hierarchy of separators – for example, using the html tags.
Splitting semantically
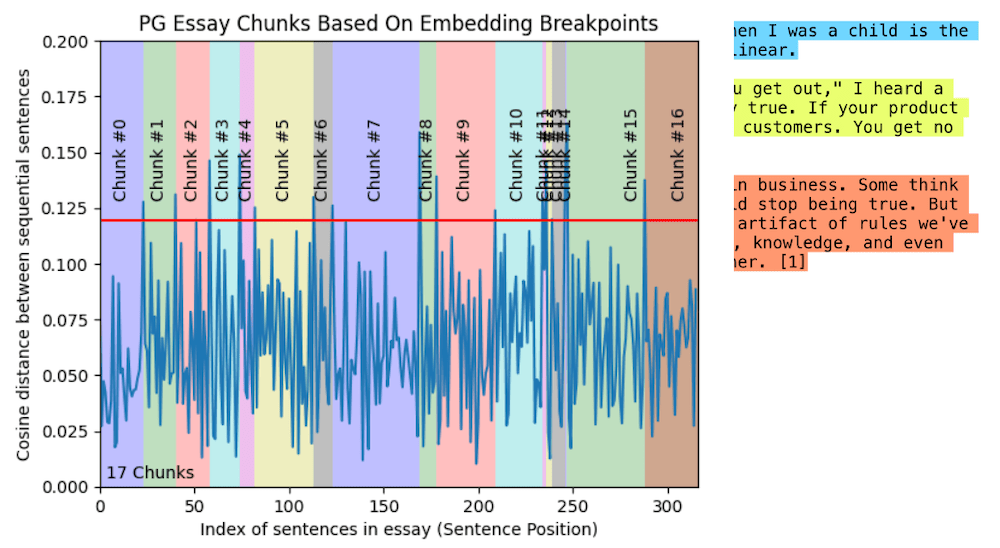
A rather new and exciting idea is to try to split the text into chunks based on its meaning rather than particular predefined separators. This can be achieved by embedding the text sentence by sentence, and measuring the distance between consecutive embeddings. Wherever there is a peak of distance, it’s like the topic has changed, and it’s a natural place for a break. Keep in mind, this makes text splitting dependent on the embedding model used.
Structure
You can keep the resulting chunks in a flat structure, one next to the other, but a much better way is to create a hierarchy. We’ll get to why and how in a further section of this article, but for now, let’s keep in mind it’s useful to perform nested text splitting – choosing parent chunks with big chunk sizes first, and then splitting each one of them further into child chunks.
Tunable parameters
After this stage, you will get a number of parameters you want to sweep through to find the configuration that works best for your use case. These will be:
- chunk size,
- chunk overlap,
- parent chunk size.
Vector databases
Now that we have our embeddings, we need to store them somewhere. Fortunately there is no need to build this storage from the ground up, as there are many refined implementations of vector databases specializing in storing, indexing, serving and performing searches on vectors. Some are even open-source!
Select your vector database
There are many options when it comes to selecting a vector database. Some of the characteristics you may want to pay attention to when making your decision are as follows:
- License – is it open source? Do you need it to be?
- Supported search – you will typically want some kind of sparse, dense and hybrid search. We’ll get to what that means in a minute.
- Managed – are you going to host the vector database yourself, or is a managed instance more up your alley?
- Framework integrations – do you care about any specific framework integrations? If your whole app is in langchain or llamaindex, you will probably require your vector database to play nicely.
- Indexing – depending on what scale of data you’re working with, you will want a different kind of index. An index is what allows you to perform an efficient vector search.
To make an informed choice you can use a comparison tool, like this one:

There are rumors of openAI and anthropic using qdrant internally – maybe there’s a slight edge there?
Configuration based on the example of Weaviate
Let’s see how to set up a vector database based on the example of Weaviate, which is one of the most popular providers.
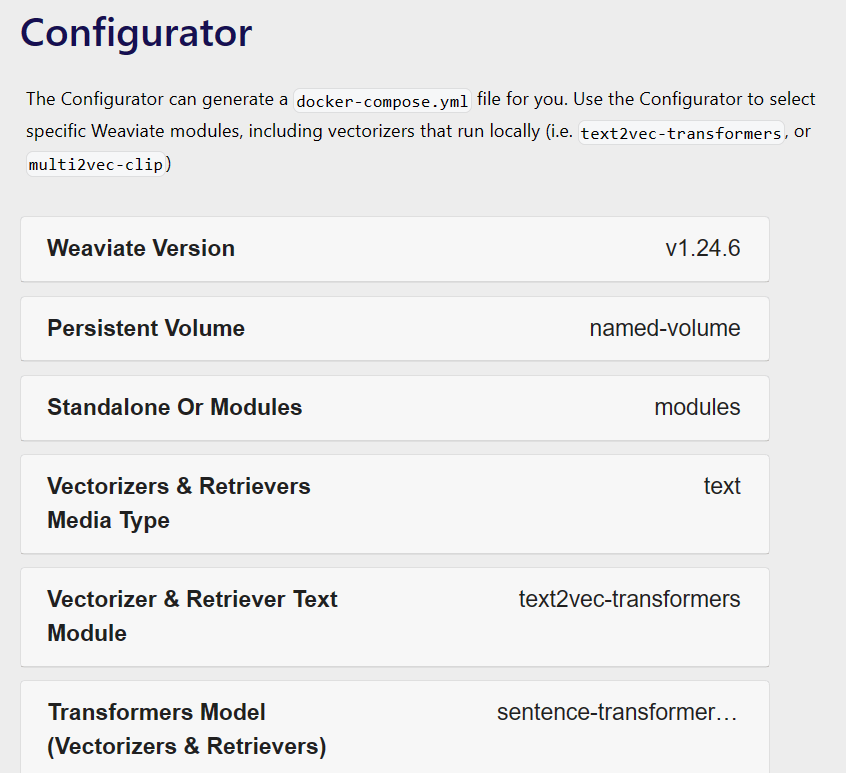
You can use a configurator to put together a docker-compose or a kubernetes-helm file that gets you started. You need to click through some options there, and if you are a data scientist, you will mostly care about the following:
Vectorizer
A vectorizer is the model that will be used to embed your data and the user queries. You can have it self-hosted. Weaviate offers a large selection of pre-built images ready to roll out. If you are into a niche model that hasn’t made its way there yet, you can build your own image, and it will work as long as it’s compatible with Hugging Face’s AutoModel. In any other case, you can’t go wrong with an external API, e.g., from openAI and their sturdy text-embedding-ada-002.
Reranker
A reranking model helps you keep the retrieval results sorted correctly – with the most important one at the top. It can be important for the quality of the generated answer, and the accuracy of the returned citation, so you may want to pay for the extra processing time and GPU usage to have it handy. The good news is that the reranking cross-encoder model will only run on the prefiltered set of retrieved chunks.
Indexes
Indexing makes it easier to calculate the semantic similarity between high-dimensional vectors, like the ones we get from text embeddings. Check out this page for a simple explanation of how different indexes work. Weaviate offers only two of them:
Flat indexing
The right choice when perfect accuracy is required and speed is not a consideration. If the dataset we are searching is small, flat indexing may also be a good choice as the search speed can still be reasonable.
HNSW
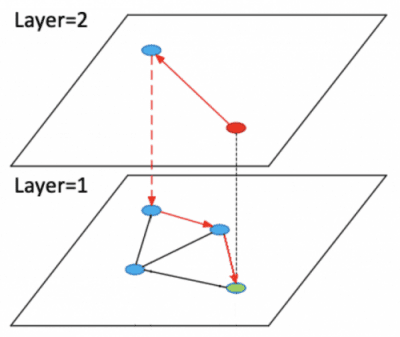
The HNSW index is a more complex index that is slower to build, but it scales well to large datasets as queries have a logarithmic time complexity. It uses a multi-layered graph approach to indexing data. The lowest layer contains all the vectors as they are – but on each higher layer, they are increasingly grouped together. The user query starts its journey at the top layer, traversing its way to the bottom, getting closer to the most similar chunk with each step.
Search methods
In a vector database, you will typically encounter the following search methods:
Full text
Used for metadata filtering. You can use some additional metadata with your chunks, such as tags, that can be used to perform initial filtering. In this case, a full-text match is necessary.
Keyword (sparse vector) search
Word frequency-based search, good for catching keywords. Let’s imagine your use case involves a number of technical user manuals. Those tend to be semantically similar, with the crucial difference of describing different equipment. In such a case, the name of the part of interest – a keyword – needs to be a significant part of the search. Weaviate uses BM25 to perform this kind of search.
Vector search
The bread and butter of similarity search methods. You can further decide on a distance metric, but the default cosine similarity tends to get the job done.
Hybrid search
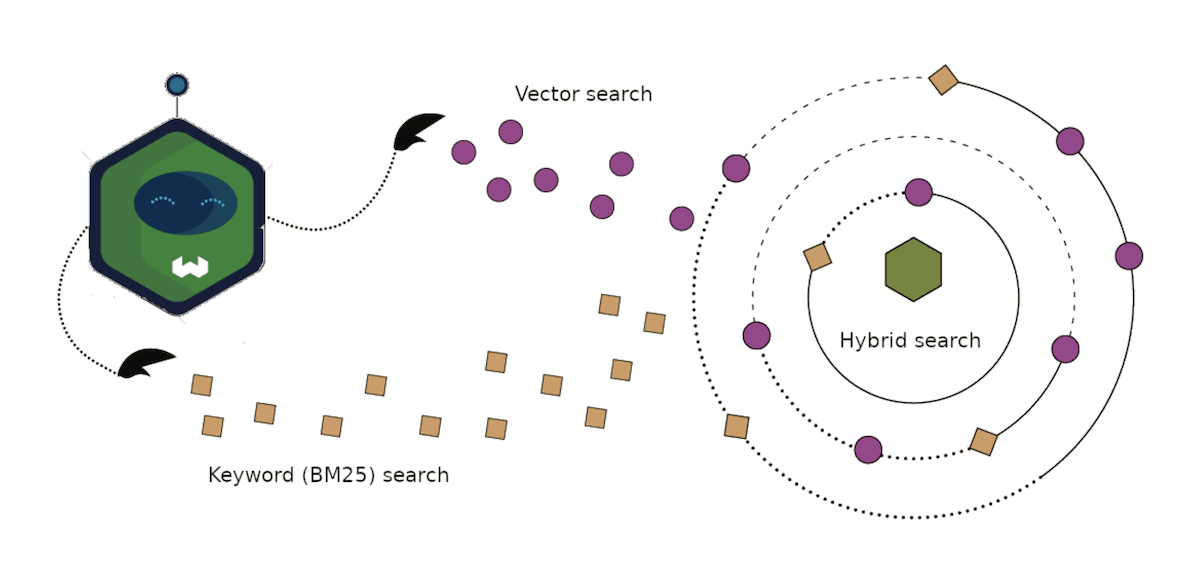
Why choose one, if you can have it all? A hybrid search combines dense and sparse vector search methods and combines the results. You can use the alpha parameter to regulate dense/sparse search importance. There are caveats though! When using a hybrid search, the confidence score is calculated as a combination of the dense/sparse confidence scores, making it harder to interpret or threshold.
Get only relevant results
At this point we should be able to retrieve chunks of information relevant to the user query – but how many of them? We need to set a limit. Not enough chunks can make us miss important information, while too many of them can bloat the LLM context and confuse it. Weaviate proposes an autocut feature – “Autocut aims to approximate where a user would cut the results intuitively after observing N jumps in the distance from the query.” It can get a bit tricky if you’re using the hybrid search method with it – the rescaled confidence score can trip autocut up. In this case, make sure you’re using RelativeScoreFusion, and not RankedFusion. It is supposed to work better, because it often results in natural clusters that autocut can detect.
Reranking
The first result is the best result. Or it should be. For a limited result set you can afford a more computationally expensive approach, so it’s the reranker’s time to shine. The cross-encoder model ingests a pair of user queries and one of the retrieved chunks to compute a relevance score between them. This number will be used to reorder the chunks and make sure the most relevant ones will be served first. An added benefit is that this score tends to be suitable for thresholding – for example, if you want to be able to decide that a similarity smaller than X should cut the RAG workflow short, and skip the answer generation step.
Tunable parameters
After this stage, the group of tunable parameters should welcome new contenders:
- hybrid search alpha parameter,
- hybrid search score fusion method,
- chunk limit,
- autocut limit,
- switching reranker on or off.
Measuring results
We have said a great deal about tuning parameters – but for tuning we need a metric to optimize. For retrieval, Mean Average Precision is a great candidate to optimize, because it only scores highly if the relevant documents are first on the list. This is a go-to metric for us in commercial projects and it has proven very reliable. Let’s go through how it works together:
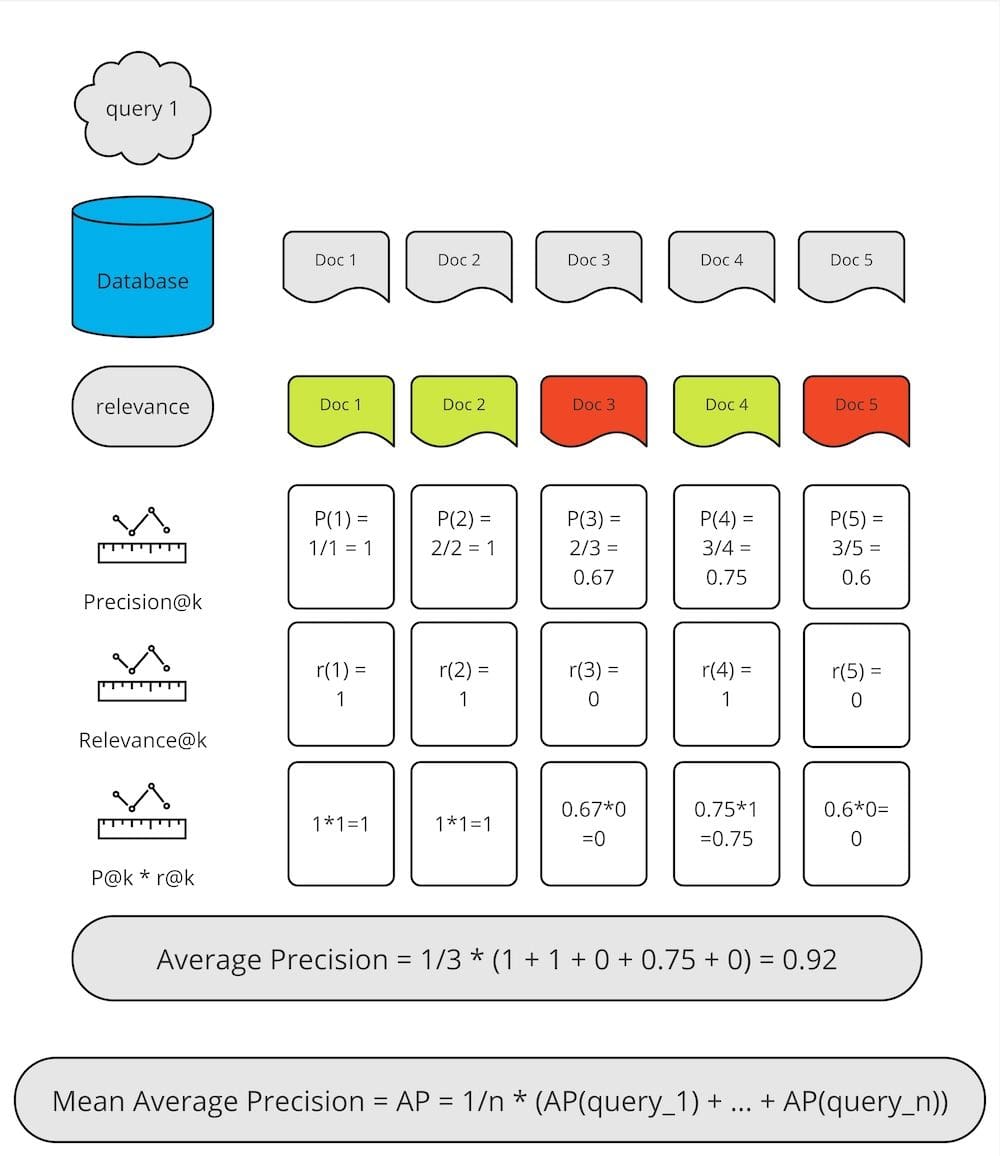
- The user query is fed into the search algorithm and results in 5 documents being retrieved.
- Only three-fifths of the documents are relevant.
- For each of the documents, we calculate the precision. Precision@k will be the ratio of relevant to missed documents for the kth result.
- For each of the documents. we multiply its relevance and its precision.
- We summate the resulting numbers, and divide it by the total number of relevant documents that it’s possible to retrieve – thus arriving at the Average Precision.
- We repeat the process for more queries, and average the results to get the Mean Average Precision.
As you can see, the calculations aren’t very complex, but you need to prepare a dataset beforehand for it to make sense. In particular, you need to be aware how many relevant documents there are for any given query. You also need to decide when a retrieved chunk is considered relevant. It can be deemed relevant if it comes from a relevant document – but if your documents are large, you may need a more precise method. You can also define a set of ground-truth sentences you think should be retrieved for a given query. It introduces a new sort of trickery, because depending on how you split your text into chunks, a given ground-truth sentence can be split into multiple chunks, or one chunk can contain more than one ground-truth sentence! In such a case, feel free to modify the Mean Average Precision definition, for example, allowing the relevance metric to exceed the [0,1] range. It won’t technically be the Mean Average Precision anymore, but it will do great for parameter optimization and comparison of different retrieval setups.
Tuning retrieval parameters
We have gathered quite a few parameters to optimize. Let’s recall what they were:
- embedding model type,
- chunk size,
- chunk overlap,
- parent chunk size,
- hybrid search alpha parameter,
- hybrid search score fusion method,
- chunk limit,
- autocut limit,
- reranker type.
To sweep through all of those effectively, we advise you to use Hydra & Neptune.ai working in tandem. You can use hydra to set up ranges for the parameter sweep conveniently. Use the –multirun option to run your tests efficiently. A simple bash script may look like this:
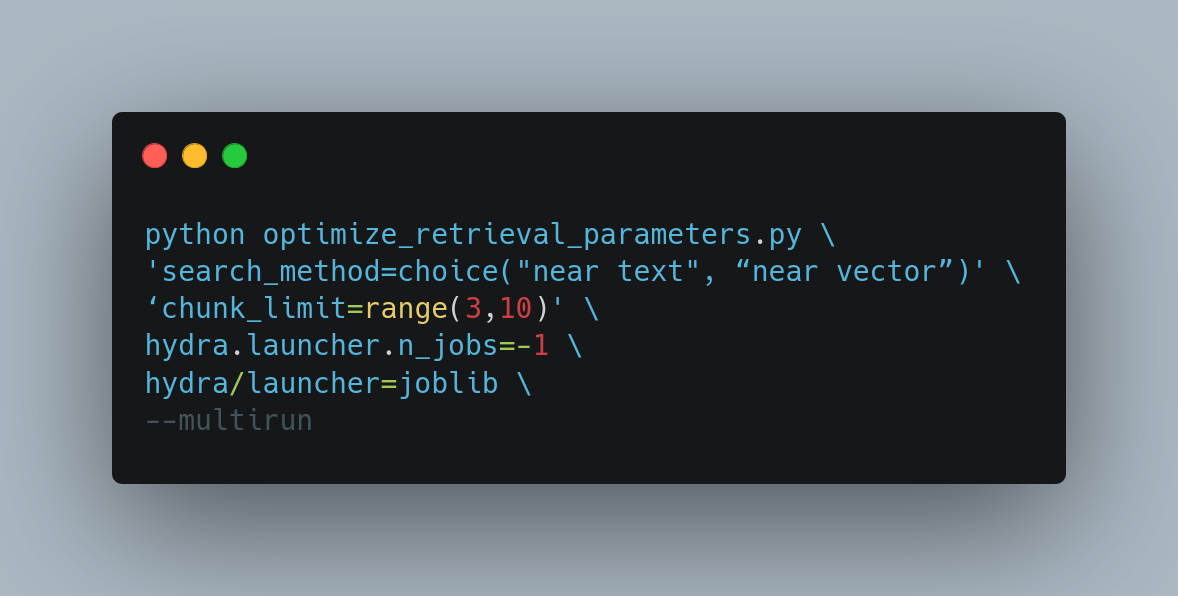
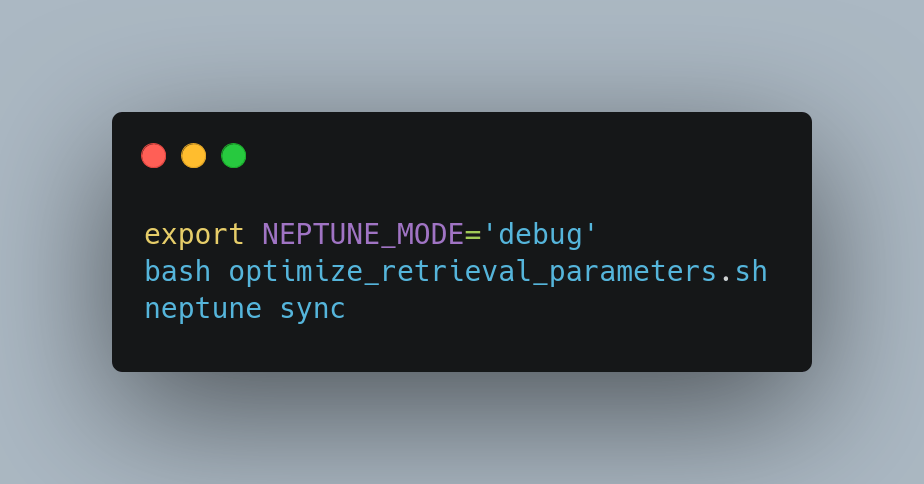
If you are running your embedding model locally, do not forget to set the hydra.launcher.batch_size when sweeping through embedding parameters, like the chunk size, to make sure you fit in your GPU’s VRAM. When running the experiments in parallel, setting the Neptune.ai synchronization to offline and uploading the experiments manually after they’re done can help you save the connection pool from unnecessary abuse. You can do it as follows:
Get accurate citations
LLM wouldn’t make stuff up, would it? Hopefully not, but as Ronald Reagan used to say – trust, but verify. We want to provide the user with the means to validate whether the generated answer is factually correct. A direct citation from the source document gets the job done – but how to get it?
Use retrieval results directly
The simplest way is to just use the passage retrieved with the highest confidence score. It won’t cover scenarios with more than one relevant passage, and sometimes it will be plain wrong, if LLM used another chunk for its response… but it still tends to work in the majority of cases, and its simplicity and lack of added complexity cannot be valued highly enough.
OpenAI Function-calling
If you are able to work with the openAI API, you can make use of their function calling feature. Just define a function that returns the answer in the form of a JSON dictionary, with keys for the answer and the citation respectively. You can index the citations to allow the model to just pick a number, making it as easy as can be. You can also opt to make the model repeat the citation verbatim, but you will quickly find out that LLMs enjoy modifying the text they repeat a bit here and there, making a direct match impossible. You can achieve a very similar result using Direct Prompting – just include a few-shot example in the model prompt, where you show that the answer always needs to be coupled with a citation index. How well is it going to work? The answer can vary wildly depending on the actual LLM you’re using, and the quality of data. LLMs on the smaller end of the spectrum, like LLAMA2 7b, cannot be trusted to select a correct citation. GPT-4 will be correct most of the time given a clean enough dataset. It’s not going to go great if your data are messy, though. Suppose the documents you use contain leftover watermarks, random numbers, or OCR artifacts. In that case, the model will have difficulty determining where one citation ends and the other starts, and which number is the citation index. Don’t forget to check out langchain implementation of those methods.
Learn from our experience – here’s what boosted the performance of our RAG systems
There are A LOT of tricks meant to improve your retrieval performance. This field is growing explosively and produces an unmanageable amount of ideas. Not all of them are all that useful though, and some just aren’t worth the time. When working on commercial projects, we sifted through the internet tips and academic papers to test them all – and a few of the methods tested have proven quite extraordinary.
Multiquery – Reciprocal Rank Fusion
Semantic search tends not to be very stable. RAG users will ask the same question in a multitude of different ways, and we would like them to always get the same results. That’s what multiquerying is for!
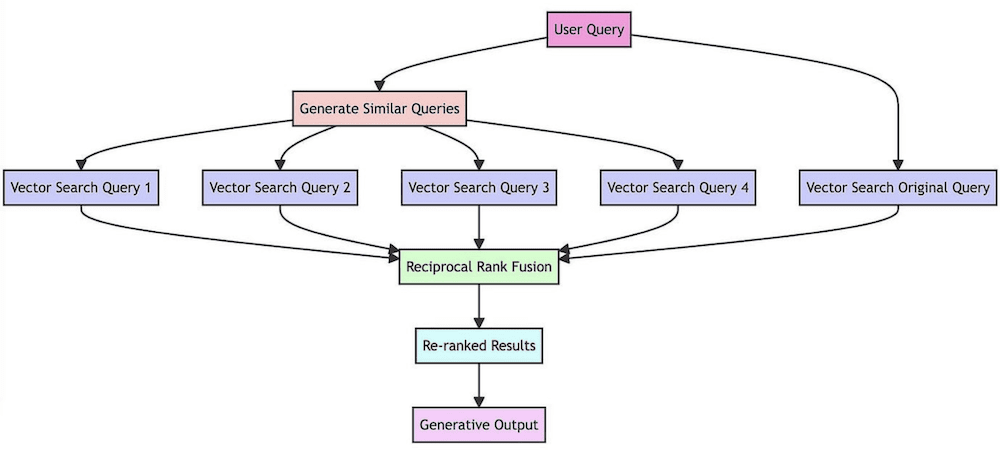
Each user query generates a number of alternatively phrased queries with the same meaning. It will work best if you use an LLM to request rephrasing, but if you are reluctant to introduce another LLM call, or are very wary of the response time, there are always simpler solutions. For example, you can shuffle the letters a bit to produce alternative queries by introducing typos. This way you will get a set of different results instead of one, so they need to be combined back into a simple list. A Reciprocal Rank Fusion algorithm can help with that. It makes sure to put the following information at the top:
- The most frequently retrieved documents
- Documents rated with the highest confidence.
This is a great method to increase retrieval stability and robustness to imperfect queries.
Hierarchical chunking
Do you want your chunks big or small?
| Small chunks, obviously, because… | Big chunks, obviously, because… |
| Small chunks make more meaningful embeddings | Big chunks decrease the risk of dropping information |
| Small chunks keep LLM context from bloating | Big chunks retain context |
| Small chunks decrease response time |
Instead of deciding, let’s try to take the best of both worlds – hierarchical chunking!
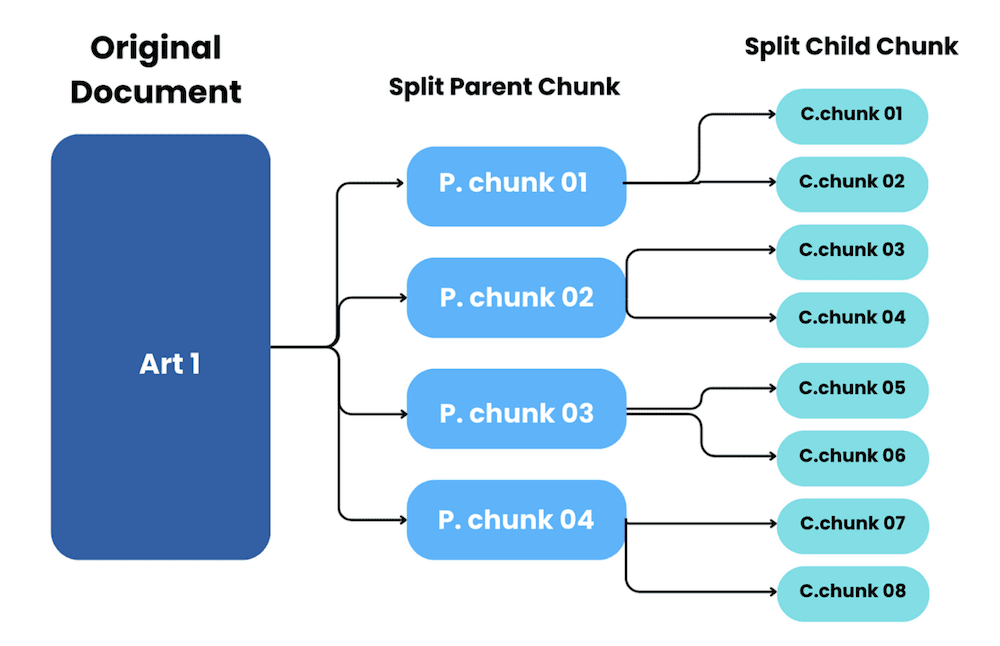
First run your text splitter with a big chunk size – bigger than you can fit into an embedding model. Then, for a second round, split each parent chunk further down into several child chunks – those will be vectorized. You will perform a similarity search on the child chunks – but you are always free to swap a child chunk for its parent before building the LLM context! A smart way to go about this is defining another tunable parameter in the range [0,1], and determining when to perform the child -> parent swap. For example, setting it to 0.5 would mean you need to retrieve at least half of all child chunks to trigger the swap for a parent.
What’s left? Well, everything else, of course!
If you followed this journey with me, I’m sure at this point you have a wonderful retrieval setup. Does it mean we’re done? Well… almost. To have a full-scale RAG system running, you need to include the answer generation stage too. You will need to come up with a few prompts for the LLM and connect to your favorite model. That’s beyond the scope of today’s adventure though – let’s take a breather and get back to this with a fresh mind!
Summary
RAG systems are great for building chatbots anchored in domain data. They are cheap to build, require no training, and solve a lot of problems inherent to generative models. RAGs validate their answers by providing citations, have a decreased probability of returning hallucinations, and are easy to adapt to a new domain, which makes them a go-to solution for multiple use cases. Building a solid retrieval mechanism is a cornerstone of any RAG system. Feeding the generative model with accurate and concise context enables it to provide great and informative answers. There is a lot of literature regarding building RAG, and filtering through all the tips and manuals can be time-consuming. We have already checked what works and what doesn’t – as part of successful commercial projects – so make sure to take advantage of a head start and use our tips:
- Be mindful when selecting the components: the vectorizer, reranker and the vector database.
- Create a benchmarking dataset – not necessarily a huge one – and tune all the retrieval parameters specifically for your use case.
- Do not forget to use multiquerying and hierarchical chunking – they give you a lot of ‘bang for your buck’.
With retrieval built this way, you are on a sure path toward a perfect RAG system.
Table of contents

