This notebook provides a guide on building a Resource Description Framework (RDF) ontology-guided Neo4j Knowledge Graph (KG) from unstructured text data using the neo4j-graphrag library.
This approach grounds the Large Language Model (LLM) to create specific expected types of entities and relationships from the provided unstructured data. By using the RDF representation of this grounding, we can pass a more formalized, semantic meaning of the relationships and entities to the LLM constructing the graph.
Additionally, we show an example of extending the library by providing a custom text chunking component that is more tailored to the structure of our sample data than the built-in FixedSizeSplitter.
Finally, we implement a basic setup of the Retrieval-Augmented Generation (RAG) features over this graph by:
- Setting up a vector store directly from within the Neo4j instance.
- Creating a similarity search Vector Retriever (an example of a number of retrievers supported by the library).
The presented KG creation process involves:
- Gathering the unstructured source data (conducted outside of this guide, with sample input source data available for download).
- Defining a custom RDF ontology.
- Generating the KG using Large Language Models (LLMs) guided by the ontology.
- Extending the
neo4j-graphraglibrary with a custom text splitter for constructing more refined text chunks of the interviews. - Setting up a simple Retrieval-Augmented Generation (RAG) logic for querying the constructed KG.
This guide demonstrates foundational steps toward a GraphRAG-based system for organizations aiming to derive structured insights from inherently unstructured data, especially in domains with complex relationships and entities.
Prerequisites
- OpenAI API Key:
This recipe uses OpenAI models in the code; feel free to swap them with alternatives. - Active/Running Neo4j DB Instance:
A local graph, AuraDB instance, or a preferred cloud vendor, e.g. AWS.
NOTE: A local Neo4j graph DB instance (configured via Neo4j Desktop on the author’s machine) is used in this notebook. Refer to the Neo4j Desktop guide for installation instructions. - Python 3.9+:
Minimum supported version for neo4j-graphrag.
Information on the Source Data/Data Gathering Step
As an example of unstructured source data, this guide uses a series of transcribed memoirs of Warsaw Uprising participants, scraped from the Warsaw Uprising Museum’s website to build a form of a remembrance graph of this historical event.
We will skip the data scraping & processing step to focus on the more relevant parts of this guide. To follow along, you can use the sample result files from this Google Drive link.
Please note:
To serve solely for demonstration purposes (and to avoid putting too much strain on the Warsaw Uprising Museum’s servers), only a handful of the memoirs were scraped.
Step 1: Dependencies Installation & Environment Setup
1.1 (Optional but Recommended) Initialize Python Virtual Environment
python -m venv venv
source venv/bin/activate
1.2 Install Necessary Dependencies
pip install dotenv neo4j neo4j-graphrag rdflib nest-asyncio tiktoken loguru pydantic
1.3 Create and Fill in the .env File Following the Example Below:
OPENAI_API_KEY=<your API key>
NEO4J_URI="bolt://localhost:7687"
NEO4J_USER=<your credentials>
NEO4J_PASSWORD=<your credentials>
1.4 Establish a ROOT_PATH
(This is just for easier OS directories/paths management of the auxiliary files.)
from pathlib import Path
ROOT_PATH = Path().resolve()
1.5 Initialize a Utility Class for Accessing the .env File (With Pydantic-Based Type Expectations)
from pydantic import Field
from pydantic_settings import BaseSettings, SettingsConfigDict

# Get the path to the .env file
ENV_FILE = ROOT_PATH / ".env" # NOTE: MAKE SURE THIS POINTS TO WHERE YOU CREATED YOUR .ENV FILE!

class Settings(BaseSettings):
    # Define your settings with types and descriptions
    database_url: str = Field(
        description="Database connection string", alias="NEO4J_URI"
    )
    api_key: str = Field(
        description="API key for external service", alias="OPENAI_API_KEY"
    )
    user: str = Field(description="DB Username credentials", alias="NEO4J_USER")
    password: str = Field(description="DB password credentials", alias="NEO4J_PASSWORD")
    debug_mode: bool = Field(False, description="Enable debug mode")
    log_level: str = Field("INFO", description="Logging level")

    model_config = SettingsConfigDict(
        # Specify the absolute path to the .env file
        env_file=str(ENV_FILE),
        # Make fields optional with default values or set them to env_required=True
        env_prefix="MY_APP_",
        # Important: this flag makes validation more forgiving
        # It will use environment variables if available, otherwise use defaults
        env_file_encoding="utf-8",
        extra="ignore",
        case_sensitive=True,
    )
Step 2: Ontology-Based Graph
2.1. Creating the RDF Ontology for the Source Data (Manual Step)
Assuming the unstructured data has already been collected, the next step is to define an ontology that the LLM will follow when constructing the graph. Since no publicly available RDF ontologies were found for this topic, a manual, LLM-assisted ontology was developed based on the input data used in this guide.
In practice, the process of constructing the graph will vary significantly based on the specific characteristics of the source data in a given project, and alternative approaches may be applicable.
To streamline the decision-making process, the problem can be categorized into three main scenarios:
- An existing formal RDF ontology is available in the domain of your data
In this case, simply use the existing ontology as input for the subsequent steps. - Some of the source data is already structured
If structured data is available, consider processing it using Neo4j’s Cypher queries rather than relying on an LLM to generate the ontology. This approach is both cost-effective (eliminating LLM usage costs) and more deterministic (reducing the risk of LLM misinterpretation during entity and relationship extraction from text-based input). However, an additional entity and relationship resolution (deduplication) step is highly recommended to avoid multiple logical duplicates in the graph. More details on this issue can be found in this Neo4j blog post. Additionally, this article outlines three common approaches, some of which leverage Neo4j’s Graph Data Science library. - All the data is unstructured and lacks an existing RDF ontology in the domain
This is the scenario considered in this guide. The process for creating an LLM-assisted ontology for this purpose is described below.
LLM-Aided RDF Ontology Creation Process
1. Generating the Initial Ontology (Google Gemini 2.0 Pro Experimental 02-05)
The ontology was generated from the three longest .txt files.
Rationale for Choosing This Model: It supports a 2M-token context window, minimizing concerns about context loss when processing lengthy input and generating a comprehensive ontology. Additionally, it was freely accessible via Google AI Studio.
2. Validating and Refining the Ontology with a Secondary LLM
The Gemini model’s output was reviewed by another LLM for correctness. To prevent token clipping, the model was prompted to return only fixed segments at a time.
Model Selection: The choice of the secondary model was more arbitrary. Options including OpenAI’s GPT-4o, Claude.ai’s Sonnet 3.7, and Perplexity.ai’s Sonar Pro all appeared effective for syntax correction. For this example, Claude.ai’s Sonnet 3.7 was selected.
Prompt 1a – Gemini 2.0 Pro Experimental 02-05 via Google AI Studio
(Used within the same chat context for continuity):
Given a series of interviews with the participants of the Warsaw Uprising, generate an ontology by extracting information about people, places, dates, and more - list down the ontology below.

interview 1:
{interview 1 txt contents}

interview 2:
{interview 2 txt contents}

interview 3:
{interview 3 txt contents}

(chat output)...

Create this ontology as an RDF ontology in a .ttl format.
Prompt 1b (Refinement Step, Same Model)
To the following RDF ontology, add more types of entities that could be meaningful when extracting entities from a transcript of an interview with a participant of the Warsaw Uprising, recalling their participation in the event and any memories before or after the event.

Only output new things to the currently existing ontology.

{.ttl ontology from prompt 1a}
Prompt 2 (Syntax Validation) – Claude Sonnet 3.7 via Claude.ai Chat
Correct any syntax issues in the following RDF `.ttl` ontology:

{your current RDF ontology}
Result Output RDF Ontology
NOTE: The full generated RDF is available at this Google Drive link. To follow along with the code, save this RDF ontology into a
.ttlfile at:./assets/interviews_ontology.ttl(or another preferred path/filename location).
Below is a fragment of the RDF ontology generated through previous steps:
@prefix rdf:  <http://www.w3.org/1999/02/22-rdf-syntax-ns#> .
@prefix rdfs: <http://www.w3.org/2000/01/rdf-schema#> .
@prefix xsd:  <http://www.w3.org/2001/XMLSchema#> .
@prefix owl:  <http://www.w3.org/2002/07/owl#> .
@prefix warsaw_uprising_transcripts: <http://example.org/warsawuprising#> .

# ---------------------------------------------------------------------------
# Ontology Header
# ---------------------------------------------------------------------------

warsaw_uprising_transcripts: a owl:Ontology ;
    rdfs:label "Warsaw Uprising Ontology"@en ;
    rdfs:comment "An ontology for representing information about the Warsaw Uprising, extracted from interview transcripts. This ontology aims to capture key entities, relationships, and attributes related to people, locations, events, and concepts discussed in the interviews."@en ;
    owl:versionInfo "1.0" .

# ---------------------------------------------------------------------------
# Class Definitions (Entities)
# ---------------------------------------------------------------------------

warsaw_uprising_transcripts:Person a owl:Class ;
    rdfs:label "Person"@en ;
    rdfs:comment "An individual who participated in or was affected by the Warsaw Uprising."@en .

warsaw_uprising_transcripts:Location a owl:Class ;
    rdfs:label "Location"@en ;
    rdfs:comment "A geographical or structural place relevant to the Warsaw Uprising."@en .

warsaw_uprising_transcripts:DateTime a owl:Class ;
    rdfs:label "DateTime"@en ;
    rdfs:comment "A specific date or time period relevant to the Warsaw Uprising."@en .

... (more) ...

# ---------------------------------------------------------------------------
# Class Subtypes (for improved categorization)
# ---------------------------------------------------------------------------

warsaw_uprising_transcripts:District a owl:Class ;
    rdfs:subClassOf warsaw_uprising_transcripts:Location ;
    rdfs:label "District"@en .

warsaw_uprising_transcripts:Street a owl:Class ;
    rdfs:subClassOf warsaw_uprising_transcripts:Location ;
    rdfs:label "Street"@en .

warsaw_uprising_transcripts:Building a owl:Class ;
    rdfs:subClassOf warsaw_uprising_transcripts:Location ;
    rdfs:label "Building"@en .

warsaw_uprising_transcripts:Battle a owl:Class ;
    rdfs:subClassOf warsaw_uprising_transcripts:Event ;
    rdfs:label "Battle"@en .

... (more) ...

# ---------------------------------------------------------------------------
# Property Definitions (Relationships and Attributes)
# ---------------------------------------------------------------------------

## --- Data Properties (Attributes) ---

warsaw_uprising_transcripts:hasName a owl:DatatypeProperty ;
    rdfs:label "has name"@en ;
    rdfs:domain rdfs:Resource ; # Broad domain, applicable to many classes
    rdfs:range xsd:string ;
    rdfs:comment "The name or title of the entity."@en .

warsaw_uprising_transcripts:hasPseudonym a owl:DatatypeProperty ;
    rdfs:label "has pseudonym"@en ;
    rdfs:domain warsaw_uprising_transcripts:Person ;
    rdfs:range xsd:string ;
    rdfs:comment "The pseudonym or code name used by a person."@en .

warsaw_uprising_transcripts:hasBirthDate a owl:DatatypeProperty ;
    rdfs:label "has birth date"@en ;
    rdfs:domain warsaw_uprising_transcripts:Person ;
    rdfs:range xsd:date ;
    rdfs:comment "The date of birth of a person."@en .

... (more) ...

## --- Object Properties (Relationships) ---

warsaw_uprising_transcripts:affiliationOrganization a owl:ObjectProperty ;
    rdfs:label "affiliation organization"@en ;
    rdfs:domain warsaw_uprising_transcripts:Person ;
    rdfs:range warsaw_uprising_transcripts:Organization ;
    rdfs:comment "Organization a person is affiliated with."@en .

warsaw_uprising_transcripts:memberOfUnit a owl:ObjectProperty ;
    rdfs:label "member of unit"@en ;
    rdfs:domain warsaw_uprising_transcripts:Person ;
    rdfs:range warsaw_uprising_transcripts:MilitaryUnit ;
    rdfs:comment "Military unit a person is a member of."@en .

warsaw_uprising_transcripts:commandsUnit a owl:ObjectProperty ;
    rdfs:label "commands unit"@en ;
    rdfs:domain warsaw_uprising_transcripts:Person ;
    rdfs:range warsaw_uprising_transcripts:MilitaryUnit ;
    rdfs:comment "Military unit commanded by a person."@en .

... (more) ...
2.2. Out-of-the-Box Ontology-Driven KG Setup
At this point, we’re ready to start constructing our Knowledge Graph.
First, let’s create a convenience class for Neo4j calls: Neo4jKG_Client.
from loguru import logger
from neo4j import Driver, GraphDatabase


class Neo4jKG_Client:
    """Neo4j Knowledge Graph Client - a small convenience function for connecting to Neo4j.

    Args:
        uri (str, optional): The URI of the Neo4j database. Defaults to None.
        user (str, optional): The username for the Neo4j database. Defaults to None.
        password (str, optional): The password for the Neo4j database. Defaults to None.

    Raises:
        AttributeError: If any of the URI, user, or password parameters are missing.

    Methods:
        __init__(uri=None, user=None, password=None):
            Initializes the Neo4jKG_Client with the given URI, user, and password.

        close():
            Closes the Neo4j driver connection.

        __call__() -> Driver:
            Returns the Neo4j driver instance.
    """

    def __init__(self, uri: str = "", user: str = "", password: str = ""):
        """Initializes the Neo4jKG_Client with the given URI, user, and password (if not provided, attempts to read from the .env file).

        Args:
            uri (str, optional): User-provided Neo4j URI upon class initialization. Defaults to `""` (will attempt to read this value from .env instead).
            user (str, optional): User-provided username value for the Neo4j instance upon class initialization. Defaults to `""` (will attempt to read this value from .env instead).
            password (str, optional): User-provided password for the Neo4j instance upon class initialization. Defaults to `""` (will attempt to read this value from .env instead).

        Raises:
            AttributeError: The class won't initialize if any of the URI, user, or password parameters are missing.
        """
        settings = Settings()  # type: ignore[call-arg]
        neo4j_uri = uri if uri else settings.database_url
        neo4j_user = user if user else settings.user
        neo4j_password = password if password else settings.password

        if not neo4j_uri or not neo4j_user or not neo4j_password:
            raise AttributeError(
                "Cannot initialize Neo4jKG client - one or more of URI, USER, or PASSWORD parameters are None or empty."
            )

        self.driver = GraphDatabase.driver(neo4j_uri, auth=(neo4j_user, neo4j_password))
        logger.info(f"Connected to Neo4j database at: {neo4j_uri}")

    def close(self):
        """Closes the Neo4j driver connection."""
        self.driver.close()
        logger.info("Neo4j driver connection closed")

    def __call__(self) -> Driver:
        """This method allows the object to be called as a function, returning the
        Neo4j driver instance that was initialized.

        Returns:
            Driver: Neo4j driver instance that was initialized.
        """
        return self.driver
Next, let’s add utility logic for reading the RDF ontology and parsing it into a Neo4j-graphrag-compatible SchemaConfig.
# Source: https://github.com/jbarrasa/goingmeta/blob/main/session31/python/utils.py

from neo4j_graphrag.experimental.components.schema import (
    SchemaBuilder,
    SchemaConfig,
    SchemaEntity,
    SchemaProperty,
    SchemaRelation,
)
from rdflib.namespace import OWL, RDF, RDFS
from rdflib import Graph

def getLocalPart(uri):
    pos = uri.rfind("#")
    if pos < 0:
        pos = uri.rfind("/")
    if pos < 0:
        pos = uri.rindex(":")
    return uri[pos + 1 :]

def getPropertiesForClass(g, cat):
    props = []
    for dtp in g.subjects(RDFS.domain, cat):
        if (dtp, RDF.type, OWL.DatatypeProperty) in g:
            propName = getLocalPart(dtp)
            propDesc = next(g.objects(dtp, RDFS.comment), "")
            props.append(SchemaProperty(name=propName, type="STRING", description=propDesc))
    return props

def getSchemaFromOnto(g) -> SchemaConfig:
    schema_builder = SchemaBuilder()
    classes = {}
    entities = []
    rels = []
    triples = []

    for cat in g.subjects(RDF.type, OWL.Class):
        classes[cat] = None
        label = getLocalPart(cat)
        props = getPropertiesForClass(g, cat)
        entities.append(SchemaEntity(label=label, description=next(g.objects(cat, RDFS.comment), ""), properties=props))

    for cat in g.objects(None, RDFS.domain):
        if cat not in classes.keys():
            classes[cat] = None
            label = getLocalPart(cat)
            props = getPropertiesForClass(g, cat)
            entities.append(SchemaEntity(label=label, description=next(g.objects(cat, RDFS.comment), ""), properties=props))

    for cat in g.objects(None, RDFS.range):
        if not (cat.startswith("http://www.w3.org/2001/XMLSchema#") or cat in classes.keys()):
            classes[cat] = None
            label = getLocalPart(cat)
            props = getPropertiesForClass(g, cat)
            entities.append(SchemaEntity(label=label, description=next(g.objects(cat, RDFS.comment), ""), properties=props))

    for op in g.subjects(RDF.type, OWL.ObjectProperty):
        relname = getLocalPart(op)
        rels.append(SchemaRelation(label=relname, properties=[], description=next(g.objects(op, RDFS.comment), "")))

    for op in g.subjects(RDF.type, OWL.ObjectProperty):
        relname = getLocalPart(op)
        doms = [getLocalPart(dom) for dom in g.objects(op, RDFS.domain) if dom in classes.keys()]
        rans = [getLocalPart(ran) for ran in g.objects(op, RDFS.range) if ran in classes.keys()]
        for d in doms:
            for r in rans:
                triples.append((d, relname, r))

    return schema_builder.create_schema_model(entities=entities, relations=rels, potential_schema=triples)
Now, let’s use the above to construct the first version of our knowledge graph using Neo4j’s “out-of-the-box” configuration (ensure your Neo4j database instance is running beforehand).
# IDEA: This is a basic variant of using the KG-creation part of the neo4j-graphrag package "out of the box"
# with just the provided custom ontology.

import asyncio
import nest_asyncio  # This is needed if we intend to run the neo4j-graphrag's `kg_builder.run_async` in a Jupyter notebook.

from loguru import logger
from neo4j_graphrag.embeddings import OpenAIEmbeddings
from neo4j_graphrag.experimental.components.text_splitters.fixed_size_splitter import (
    FixedSizeSplitter,
)
from neo4j_graphrag.experimental.pipeline.kg_builder import SimpleKGPipeline
from neo4j_graphrag.llm import OpenAILLM
from rdflib import Graph

# Connect to the Neo4j database
neo4j_client = Neo4jKG_Client()
driver = neo4j_client()
settings = Settings()  # type: ignore[call-arg]

# Initialize the path to the ontology file
ontology_path = (
    ROOT_PATH
    / "assets/interviews_ontology.ttl"  # NOTE: Make sure this path points to the ontology .ttl file you saved at the end of step 2.1.
)

# Define the path to your downloaded source data samples.
interviews_path = ROOT_PATH / "scraped_data/interviews" # NOTE: Make sure this path points to where you stored the downloaded source data.

# Initialize the custom ontology
g = Graph()
neo4j_schema = getSchemaFromOnto(g.parse(ontology_path))

# Instantiate the LLM, the splitter, and the embedder
llm = OpenAILLM(
    api_key=settings.api_key,
    model_name="gpt-4o-mini",
    model_params={
        "max_tokens": 5000,
        "response_format": {"type": "json_object"},
        "temperature": 0,
    },
)

splitter = FixedSizeSplitter(chunk_size=2500, chunk_overlap=10)
embedder = OpenAIEmbeddings(model="text-embedding-3-large", api_key=settings.api_key)

# Instantiate KG builder
if neo4j_schema.relations is None or neo4j_schema.entities is None:
    raise ValueError("Provided schema has no relations or entities.")

kg_builder = SimpleKGPipeline(
    llm=llm,
    driver=driver,
    text_splitter=splitter,
    embedder=embedder,
    entities=list(neo4j_schema.entities.values()),
    relations=list(neo4j_schema.relations.values()),
    potential_schema=neo4j_schema.potential_schema,
    on_error="IGNORE",
    from_pdf=False,
)

# Extra bit needed if running inside a Jupyter notebook (to avoid RuntimeError with asyncio).
nest_asyncio.apply()

async def process_file(text):
    await kg_builder.run_async(text=text)

# BUILD the graph
for file_path in interviews_path.glob("*.txt"):
    with file_path.open("r", encoding="utf-8") as file:
        logger.info("Processing file:", file_path.name)
        asyncio.run(kg_builder.run_async(text=file.read()))

logger.info("BASIC KG CREATION PART DONE")
Generated Result:
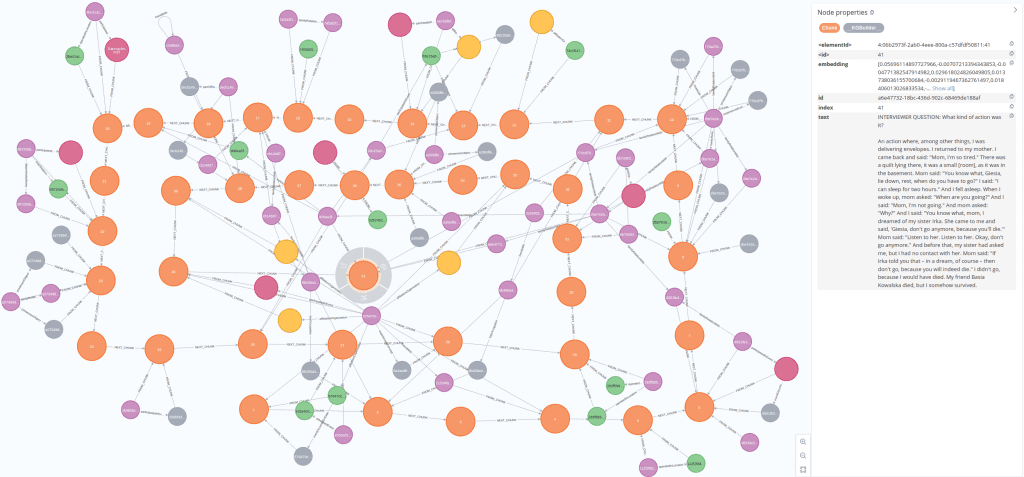
An excerpt of the generated knowledge graph – a chain of 5 first chunks (orange nodes) from a single interview piece is shown below with various entities/relationships extracted from them.
Problem Observed:
Notice how the interview chunk nodes are cut mid-way through the interviewee’s response (screenshot below).
This could result in poorer entity/relationship extractions by the LLM, as it operates on text that is potentially separated from the response’s context.
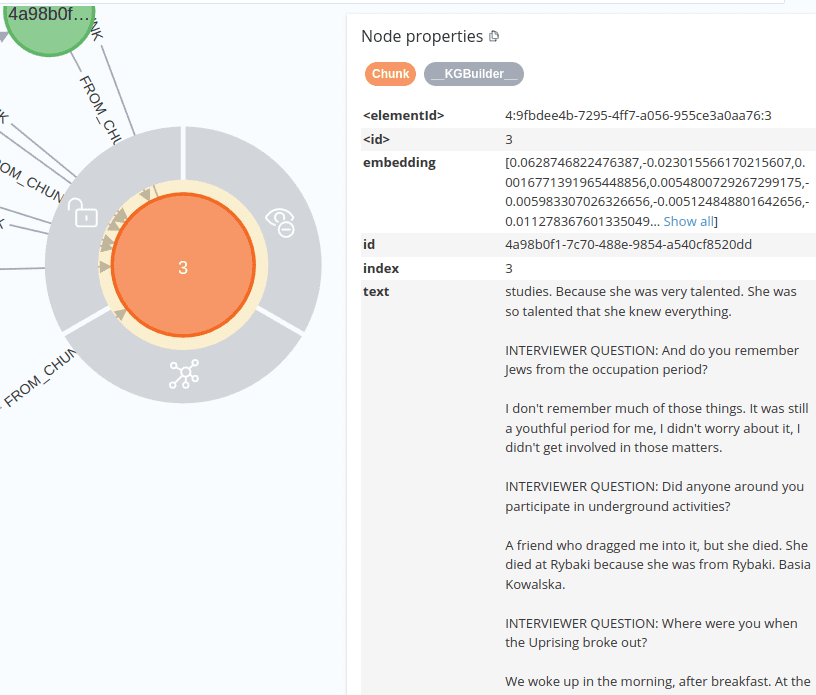
Two issues with the current text splitting logic for chunks are evident in the screenshot above:
1) It contains multiple interview fragments in one chunk. Since that chunk is passed to the LLM, if fragments of the interview happen to be unrelated (or off-topic), the LLM may struggle to extract the correct entities and relationships.
2) The interviewee’s responses are cut mid-way through their response.
(Example: “studies. […]” is clearly an end of the previous thought but is split into the next chunk, losing context.)
This can negatively impact the LLM’s entity extraction and hinder graph readability for human users.
Proposed solution:
We aim to fix this by creating a custom text splitter and passing it to the neo4j-graphrag’s SimpleKGPipeline.
The logic we are aiming for is to have one chunk represent a single “Question -> Response” fragment of the interview source data. If that’s not possible due to length constraints, the next chunk should contain the repeated question along with a (response continued) ... text marker to indicate continuation.
2.3. Extending neo4j-graphrag Package – Custom TextSplitter
Custom TextSplitter Logic
Here we implement the aforementioned idea by creating a child class of the TextSplitter neo4j-graphrag component.
import asyncio
import tiktoken
from neo4j_graphrag.experimental.components.text_splitters.base import TextSplitter
from neo4j_graphrag.experimental.components.types import TextChunk, TextChunks
from neo4j_graphrag.llm import OpenAILLM

class InterviewSplitter(TextSplitter):
    def __init__(self, llm: OpenAILLM, overlap_percentage: float = 0.2) -> None:
        self.llm = llm
        self.overlap_percentage = overlap_percentage
        if not 0.0 <= overlap_percentage <= 1.0:
            raise ValueError("overlap_percentage must be between 0.0 and 1.0")

        # Get the encoding for the model being used
        model_name = self.llm.model_name
        try:
            self.tokenizer = tiktoken.encoding_for_model(model_name)
        except KeyError:
            # Fallback to cl100k_base encoding (used by many OpenAI models)
            self.tokenizer = tiktoken.get_encoding("cl100k_base")

    async def run(self, text: str) -> TextChunks:
        """Splits the text by 'INTERVIEWER QUESTION:' and then further sub-splits if necessary."""
        parts = text.split("INTERVIEWER QUESTION:")
        cleaned_parts = [part.strip() for part in parts if part.strip()]

        interruption_text_marker = "... [pause in the response]."
        continuation_text_marker = "[response continued]"

        all_chunks = []
        for idx, part in enumerate(cleaned_parts):
            # Add the "INTERVIEWER QUESTION:" prefix back to each part except the first one.
            if idx == 0:
                part = (
                    "INTERVIEWER QUESTION: None - this person introduces themselves. \n" + part
                )
            else:
                part = "INTERVIEWER QUESTION: " + part

            tokens = self.tokenizer.encode(part)
            max_tokens = min(
                4096,  # Default context window
                self.llm.model_params.get("max_tokens", 3000) * 3,  # Estimated input tokens
            )

            if len(tokens) <= max_tokens:
                all_chunks.append(TextChunk(index=len(all_chunks), text=part))
            else:
                # Sub-split the part with overlapping
                chunk_size = int(max_tokens * (1 - self.overlap_percentage))
                overlap_size = int(max_tokens * self.overlap_percentage)
                sub_chunks = []
                interviewer_question = part.split("\n")[0]

                for i in range(0, len(tokens), chunk_size):
                    start_index = max(0, i)
                    end_index = min(i + chunk_size + overlap_size, len(tokens))
                    current_chunk_tokens = tokens[start_index:end_index]
                    current_chunk_text = self.tokenizer.decode(current_chunk_tokens)

                    # Add an extra marker if this is a subdivided text
                    if i + chunk_size < len(tokens):
                        current_chunk_text += interruption_text_marker

                    # Add the repeated question to all but the first subdivided text
                    # Also, add extra metadata to the TextChunk: "interview_point: continuation of the question"
                    if i == 0:
                        sub_chunks.append(TextChunk(index=len(all_chunks), text=current_chunk_text))
                    else:
                        current_chunk_text = (
                            f"REPEATED INTERVIEWER QUESTION: {interviewer_question} \n\n\n "
                            f"{continuation_text_marker} ... {current_chunk_text}"
                        )
                        sub_chunks.append(
                            TextChunk(
                                index=len(all_chunks),
                                text=current_chunk_text,
                                metadata={"interview_point": "continuation in answering the question"},
                            )
                        )

                    all_chunks.extend(sub_chunks)

        return TextChunks(chunks=all_chunks)

    def split_text(self, text: str) -> TextChunks:
        """Synchronously calls the async run method."""
        return asyncio.run(self.run(text))
Implementation in the Main Logic
# (The rest of the code from step 2.2 remains unchanged except the following changes)
# ...

splitter = InterviewSplitter(
    llm=llm
)  # Pass the LLM instance for max tokens calculation (i.e. where to split)

# ...
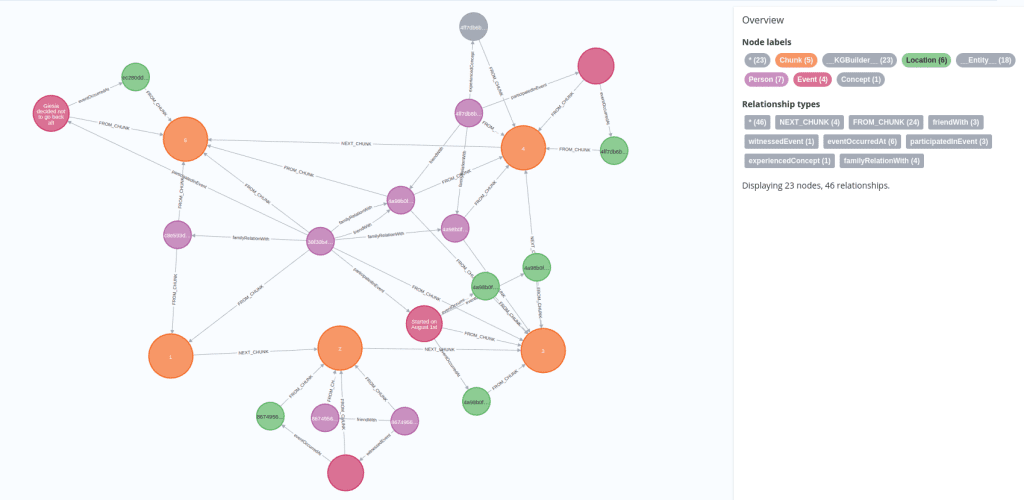
Results Overview
Initial observations (overview screenshot below):
- For the same amount of interview text there are significantly more text
Chunknodes (was 5 text chunk, now there is 41). This is expected as each now node contains only one “interview question -> response” fragment rather than multiple ones, as before. - Arguably, more entities/relationships are extracted. In the example of a single interview chain graph above, each chunk has 1-5 entities/relationships extracted from it – roughly the same number as in the previous graph – but now there are more Chunks.
- Not all Chunks have any entities/relationships extracted. This is sensible, as some interview fragments consist of very short “{question}? Yes/No” responses. However, it is still unfortunate that the LLM could not extract anything meaningful from such fragments.
Let’s now inspect individual text Chunks to see if their structure has also improved.
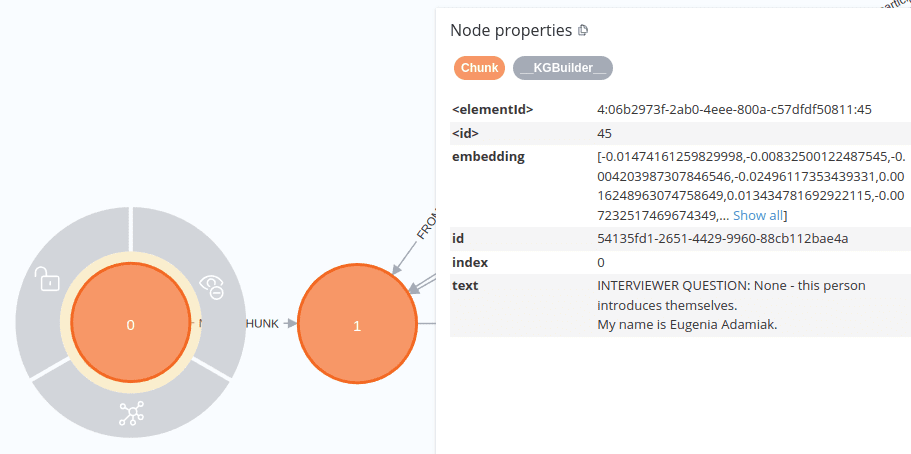
1. Initial Interview Fragment
Observations:
- Our custom
InterviewSplittercorrectly marked the first interview fragment (which usually lacks the interviewer’s question). - It then proceeded by capturing only the response to the first question in the first text chunk.
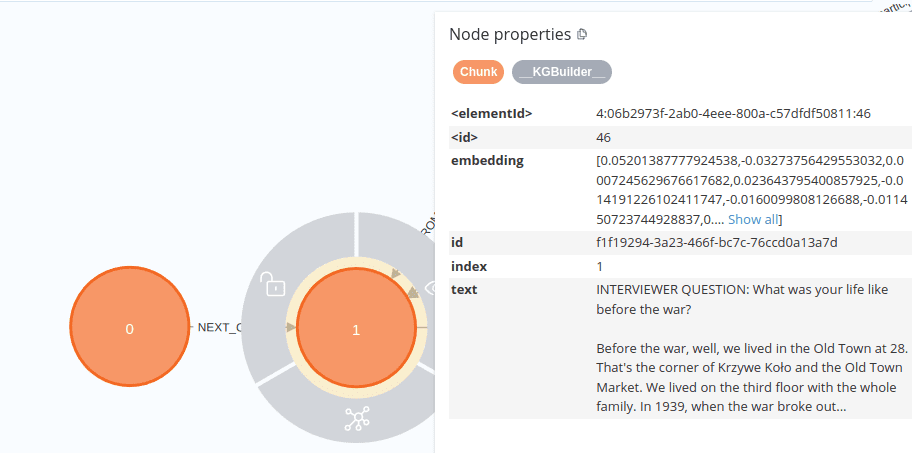
2. Subsequent Interview Fragment
- Each chunk now represents a single “Question → Response” fragment.
- In most cases, chunks are smaller, containing only one interview exchange. The exception is when there is a very long response, in which case the chunk is further subdivided.
3. Excessively Long Interview Fragment Example
In such cases, we observe that:
- The
InterviewSplitterdivided the interviewer’s response, marking the split with... [pause in the response]. According to the class’s code, this division was based on an estimated maximum token length window.

Let’s now examine the next Chunk following this split.
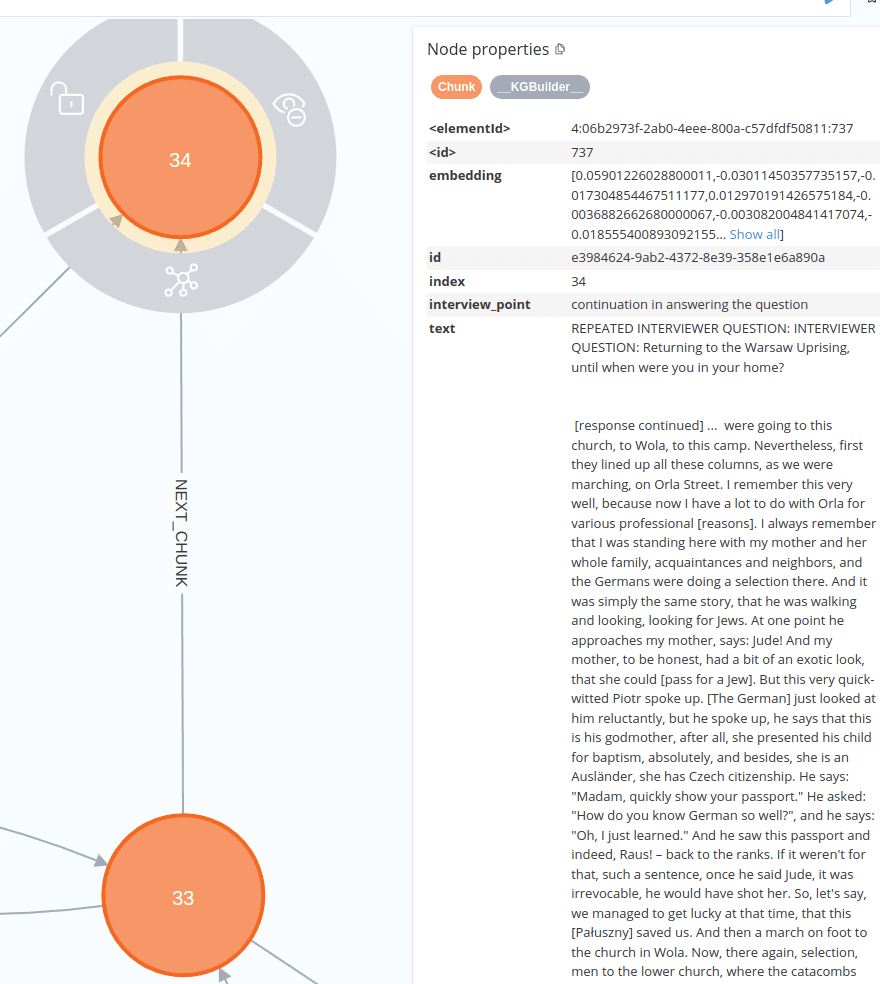
4. Continuation of an Excessively Long Interview Fragment
- The continuation chunk contains the “REPEATED INTERVIEW QUESTION” fragment and the
[response continued] ...marker. - An additional property,
interview_point: continuation in answering the question, was added to the Chunk’s metadata. This was achieved by incorporating it as ametadataparameter in theTextChunkfor such continuation Chunk nodes within theInterviewSplitterclass code.
Recap of This Step
- We extended the out-of-the-box Neo4j-GraphRAG setup by implementing a custom
InterviewSplitter(subclassing the library’s baseTextSplitter) and using it instead of the default splitter. - This custom splitter structures the source data into more desirable text chunks.
- The result is an improved lexical graph output and (arguably) better extraction of entities and relationships by the LLM. It also illustrates how to extend components of the neo4j-graphrag package beyond what is present in the official documentation.
Step 3: Implementing RAG
3.1. Creating and Populating the Vector Store with Chunk Node Embeddings
Note: The embeddings were already generated as a parameter in the Chunk nodes within the SimpleKGPipeline because we passed the embedder parameter during function initialization.
from loguru import logger
from neo4j_graphrag.indexes import create_vector_index, upsert_vector

# Define vector store name and embedding dimensions.
VECTOR_STORE_NAME = "interview_embeddings_store"
DIMENSION = 3072

def get_chunk_embeddings(driver) -> list:
    """
    Retrieve all Chunk nodes along with their embedding properties.
    Returns a list of tuples (node_id, embedding).
    """
    with driver.session() as session:
        result = session.run(
            """
            MATCH (c:Chunk)
            WHERE c.embedding IS NOT NULL
            RETURN id(c) AS node_id, c.embedding AS embedding
            """
        )

        # Extract node IDs and embeddings
        embeddings_data = [
            (record["node_id"], record["embedding"]) for record in result
        ]

        return embeddings_data

def main():
    # Establish a connection to the Neo4j database.
    neo4j_client = Neo4jKG_Client()
    driver = neo4j_client()

    # Create a vector index in Neo4j using the built-in method.
    create_vector_index(
        driver,
        name=VECTOR_STORE_NAME,
        label="Document",
        embedding_property="vectorProperty",
        dimensions=DIMENSION,
        similarity_fn="euclidean",
    )

    try:
        # Fetch all chunk nodes along with their embeddings from the database.
        embeddings_data = get_chunk_embeddings(driver)

        if not embeddings_data:
            logger.warning("No Chunk nodes with embeddings found.")
            return

        logger.info(
            f"Adding {len(embeddings_data)} embeddings to vector store '{VECTOR_STORE_NAME}'..."
        )

        # Track successful operations for reporting.
        successful_ops_counter = 0

        # Process and upsert each node's embedding into the vector store.
        # This transfers embeddings data from standard node properties into a dedicated Neo4j vector index (adds or updates if it's a re-run operation).
        for node_id, embedding in embeddings_data:
            upsert_vector(
                driver,
                node_id=node_id,
                embedding_property="embedding",
                vector=embedding,
            )
            successful_ops_counter += 1

        logger.info(
            f"Successfully added {successful_ops_counter} embeddings to the vector store."
        )

    except Exception as e:
        logger.error(f"Error: {e}")
    finally:
        driver.close()

main()
3.2 RAG Setup
from neo4j_graphrag.embeddings import OpenAIEmbeddings
from neo4j_graphrag.generation import GraphRAG
from neo4j_graphrag.llm import OpenAILLM
from neo4j_graphrag.retrievers import VectorRetriever

URI = "neo4j://localhost:7687"
INDEX_NAME = "interview_embeddings_store"
DATABASE = "neo4j"

neo4j_client = Neo4jKG_Client()
driver = neo4j_client()

# 2. Retriever
# Create an Embedder object to convert the user's question (text) into a vector
# NOTE: The same embedding model used for knowledge graph creation must be used here.
embedder = OpenAIEmbeddings(model="text-embedding-3-large", api_key=settings.api_key)

# Initialize the retriever
retriever = VectorRetriever(driver, INDEX_NAME, embedder)

# 3. LLM
llm = OpenAILLM(api_key=settings.api_key, model_name="gpt-4o", model_params={"temperature": 0})

# Initialize the RAG pipeline
rag = GraphRAG(retriever=retriever, llm=llm)

# Query the graph
query_text = "Tell me something about Janina Abramowska"
response = rag.search(query_text=query_text, retriever_config={"top_k": 5})
print(response.answer)
Janina Abramowska is a Polish literary scholar and professor. She is known for her work in the field of literary studies, particularly focusing on Polish literature. Abramowska has contributed significantly to the academic understanding of literary theory and criticism, and her research often explores themes related to Polish literary history and analysis.
Summary
In this guide, we built an ontology-guided, LLM-generated Knowledge Graph on a Neo4j database using the neo4j-graphrag library. Specifically, we:
- Created a custom RDF ontology for our niche dataset using LLM chatbot services and input source text data.
- Implemented ontology-driven KG-generation over our scraped data using the “out-of-the-box”
neo4j-graphragsetup and our manually constructed RDF ontology. - Extended the
neo4j-graphraglibrary by introducing a customInterviewSplitterto enhance the generated Lexical Graph. - Integrated a vector store and implemented basic Retrieval-Augmented Generation (RAG) capabilities.
Next Steps
Further Knowledge Graph Generation Enhancements
- Experiment with different LLMs and refine prompt engineering.
- Integrate external knowledge sources on the Warsaw Uprising and interconnect them with our LLM-generated graph.
- Develop an Entity/Relationship Resolution strategy to manage duplicate entities and relationships.
Improving RAG Capabilities
- Implement advanced vector embedding techniques (currently, only the
textfields of theChunknodes are embedded, making them the only source for similarity search). - Explore additional retrieval strategies beyond similarity search, such as fuzzy, Cypher, or hybrid retrievers.
- Introduce agentic approaches where different retrievers are dynamically selected based on query type, with an LLM agent optimizing response generation.
We hope this guide helps you build ontology-driven Knowledge Graphs using the neo4j-graphrag library for your next GraphRAG application!
Author
Grzegorz Rybak
Data Engineer