Table of contents
Industry data consistently shows that a large portion of AI initiatives never reach full production. The dominant causes are architectural: lack of operational readiness, weak integration patterns, missing observability, and brittle prototypes that cannot evolve.
ragbits was built to address that layer.
It is the framework we use to deliver GenAI systems, from early validation to production deployment, without rebuilding the stack at each phase.
This 1.4 release introduces new production-focused capabilities, and for teams new to ragbits, we’ll walk step by step through how to install it, run a minimal application, and incrementally extend it with the new features.
Who can benefit from using a framework like ragbits?
ragbits is built for teams developing RAG platforms, copilots, or agent-based systems that need production-grade foundations from the start:
- authentication and access control,
- secure integration with internal data sources,
- structured evaluation and observability,
- and modular architecture that allows models, retrieval strategies, and components to be swapped without rewrites.
It is particularly relevant for organizations that want to avoid vendor lock-in, reduce architectural drift across AI initiatives, and prevent early prototypes from becoming long-term technical liabilities.
What is ragbits, our open-source framework for agentic AI and LLM-based applications?
ragbits is an open-source framework for LLM-based applications, developed internally and deployed in commercial environments—including regulated and enterprise-grade systems. It already has 1.6k stars on GitHub!
We use it to standardize LLM architecture across projects, reduce engineering variance, and shorten time-to-production.
With ragbits 1.4, we strengthened the areas that determine whether an LLM system can operate inside a real organization:
- OAuth2-based authentication
- Controlled file uploads for RAG workflows
- Structured error handling
- Custom response types for orchestration
- UI customization without frontend rewrites
How to kickstart with ragbits?
We will start with a simple ragbits application, and one-by-one add new features. The full code can be found on github:
from ragbits.chat.api import RagbitsAPI, ChatInterface
from ragbits.chat.interface.types import ChatContext, TextContent, TextResponse
from ragbits.core.prompt import ChatFormat
from ragbits.core.llms import LiteLLM

class SimpleStreamingChat(ChatInterface):
    def __init__(self):
        self.llm = LiteLLM(model_name="gpt-5.2")

    async def chat(self, message: str, history: ChatFormat, context: ChatContext):
        conversation_history = [
            {"role": "system", "content": "Answer everything relatively shortly"},
            *history,
            {"role": "user", "content": message}
        ]
        result = self.llm.generate_streaming(conversation_history)
        async for event in result:
            yield self.create_text_response(event)

api = RagbitsAPI(
    SimpleStreamingChat,
    cors_origins=["http://localhost:8000", "http://127.0.0.1:8000"]
)

app = api.app
Here is how to app looks like out of the box:
To run it, make sure that you have installed the new version of ragbits:
pip install ragbits-core==1.4.2 ragbits-chat==1.4.2
or
uv add ragbits-core==1.4.2 ragbits-chat==1.4.2
Also, make sure that you have appropriate environment variables installed. You will need OPENAI_API_KEY (see env.template in the repository).
What’s new in ragbits 1.4?
Release 1.4 introduces several UI changes that are often required when developing with LLMs. That includes:
- OAuth 2.0 authentication
- File upload handlers
- Error Responses
- Custom Responses
- Custom themes
OAuth 2.0 authentication
OAuth 2.0 is a standard protocol for delegated authorization, allowing an application to access another system’s resources with the user’s approval. In particular, it can be used to authenticate a user with third-party services. Developers who want to implement it in their application need to be familiar with the flow of requests and redirects defined in the standard:
- The application needs to redirect to the third-party authorization server (for example, https://accounts.google.com/o/oauth2/v2/auth)
- The authorization server redirects back to our application at the specified callback endpoint, sending an authorization code
- The application backend uses the authorization code, along with a secret, to obtain an access token for the user. That token can finally be used to authenticate the user
In order to make it work, the developer also needs to manage things like state parameters (sent to the authorization server and back), storing the states, verifying them, sending the appropriate redirect_uri, and so on.
Ragbits automates all of that. In order to perform an authentication with Google, all you need is to specify a Google AuthenticationBackend defined in Ragbits:
from ragbits.chat.auth.session_store import InMemorySessionStore
from ragbits.chat.auth.oauth2_providers import OAuth2Providers
from ragbits.chat.auth.backends import OAuth2AuthenticationBackend

auth_backend = OAuth2AuthenticationBackend(
    session_store=InMemorySessionStore(),
    provider=OAuth2Providers.GOOGLE,
    redirect_uri="http://127.0.0.1:8000/api/auth/callback/google"
)
We need to define the GOOGLE_CLIENT_ID and GOOGLE_CLIENT_SECRET environment variables. Then, we just pass that auth_backend to the RagbitsAPI:
api = RagbitsAPI(
    SimpleStreamingChat,
    cors_origins=["http://localhost:8000", "http://127.0.0.1:8000"],
    auth_backend=auth_backend,
)
That’s it! You can run the app with RAGBITS_BASE_URL=http://127.0.0.1:8000 uvicorn main:app. If you want, you can also replace that backend with any other authentication backend. In particular, adding other OAuth 2.0 providers is as simple as specifying a few required parameters:
GOOGLE = OAuth2Provider(
    name="google",
    display_name="Google",
    authorize_url="https://accounts.google.com/o/oauth2/v2/auth",
    token_url="https://oauth2.googleapis.com/token",
    user_info_url="https://www.googleapis.com/oauth2/v2/userinfo",
    scopes=["openid", "email", "profile"],
    user_factory=lambda user_data: User(
        user_id=f"google_{user_data['id']}",
        username=str(user_data.get("email", "")).split("@")[0],
        email=str(user_data["email"]) if user_data.get("email") else None,
        full_name=str(user_data["name"]) if user_data.get("name") else None,
        roles=["user"],
        metadata={
            "provider": "google",
            "picture": user_data.get("picture"),
            "verified_email": user_data.get("verified_email"),
            "hd": user_data.get("hd"),  # Google Workspace domain
        },
    ),
)
Here is how the final app looks like:
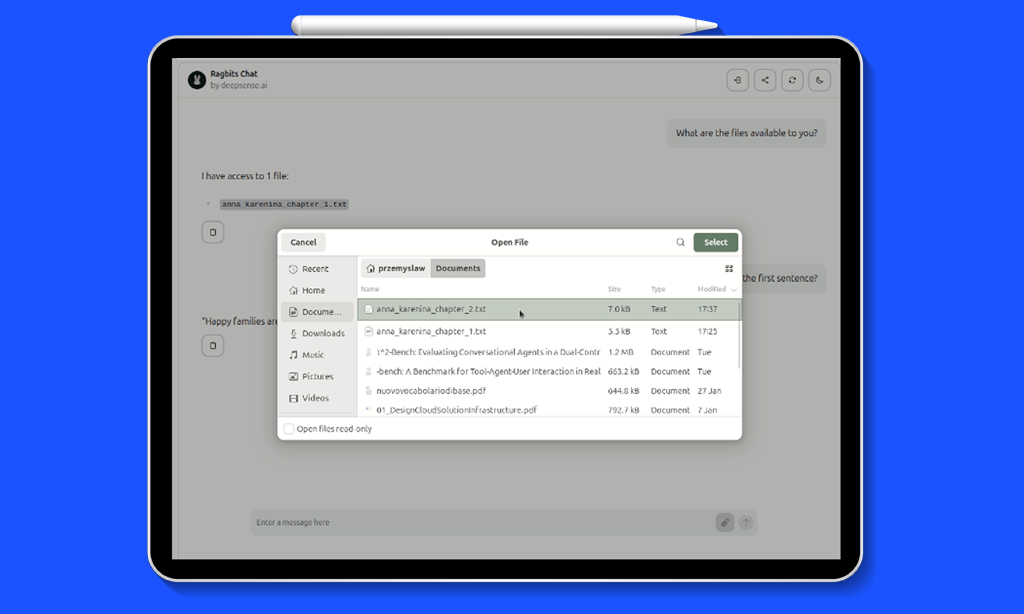
File uploads
One common use case for custom LLM solutions is working with internal data that is not available to the LLM. This is why RAG solutions are so popular. ragbits UI allows users to upload their own files, which are handled on the backend via an upload_handler. Below, we demonstrate how to implement it.
The idea is to allow the user to upload files from their computer. We will give the LLM access to it in a system prompt. For the demo, the files will be stored in a Python dictionary. In a production settings, more advanced solutions can be used, including the ones available via ragbits-document-search package. For now, let’s focus on simplicity.
In the __init__ method, we add a self.files attribute:
def __init__(self):
    self.llm = LiteLLM(model_name="gpt-5.2")
    self.files = {}
The upload handler will simply add the file’s contents to the dictionary.
async def upload_handler(self, file: UploadFile) -> None:
    content = await file.read()
    filename = file.filename
    self.files[filename] = content
Finally, the chat method will include the content of all the available files in the system prompt:
files_content = "\n\n".join([f"Title: {title}\n\nContent: {content}" for title, content in self.files.items()])
conversation_history = [
    {"role": "system", "content": "Answer everything shortly"},
    {"role": "system", "content": f"Available files:\n\n{files_content}"},
    *history,
    {"role": "user", "content": message}
]
The result is as follows:
Error respones
The ragbits architecture has the ChatInterface responsible for communicating with the Ragbits UI. The API sends a stream of Server Side Events that the UI needs to handle. self.create_text_response is an example of such event of type “text”. Ragbits allows sending multiple types of such events. Since 1.4, error is one of them.
Let’s create a UI that rejects users who swear and returns an error for such messages.
from ragbits.chat import ErrorResponse, ErrorContent

async def chat(self, message: str, history: ChatFormat, context: ChatContext):
    if "freak" in message.lower():
        yield ErrorResponse(content=ErrorContent(message="Message rejected. Be nice!"))
        return
Custom responses
The idea above of handling arbitrary events can be extended to custom responses we define ourselves. This may be very useful if our backend needs to send some commands to the UI (or any other client). We won’t cover implementing custom UI handlers in this post, but we will show how to send custom commands from the backend.
from ragbits.chat import ChatResponse, ResponseContent

class CustomContent(ResponseContent):
  name: str
  age: int

  def get_type(self) -> str:
      return "custom"


class CustomResponse(ChatResponse[CustomContent]):
  """Custom response that the RagbitsAPI can stream"""
To use them, simply yield them in the chat method:
yield CustomResponse(content=CustomContent(name="John", age=30))
Custom themes
By default, ragbits looks modern and elegant from the start. However, you can customize it to your needs without modifying the UI code. Release 1.4 introduced support for custom themes. You can choose among any HeroUI themes or write your own according to HerokuUI documentation. Here, we will use a “coffee” theme. We download it and save it in “theme.json”. To use it, simply pass the theme_path parameter to the RagbitsAPI:
api = RagbitsAPI(
    SimpleStreamingChat,
    cors_origins=["http://localhost:8000", "http://127.0.0.1:8000"],
    auth_backend=auth_backend,
    theme_path="theme.json"
)
When testing multiple themes, remember to clear your browser cookies.
Additionally, you can customize the package’s titles and text with custom messages. That includes a header, page title, welcome message, favicon, icon, and logo.
from ragbits.chat.interface.ui_customization import UICustomization, HeaderCustomization, PageMetaCustomization

class SimpleStreamingChat(ChatInterface):
    ui_customization = UICustomization(
        header=HeaderCustomization(title="My Custom Ragbits App", subtitle="demo for release 1.4"),
        welcome_message="Ask any question about **React component libraries**",
        meta=PageMetaCustomization(page_title="Demo")
    )
Here is the final effect:
To have a full control over the UI, you need to clone the Ragbits’ Typescript code, but for basic customization, existing options work quite well.
Wrapping up
We hope this post is useful as you develop LLM-based applications! There are more Ragbits releases coming up, with the next focusing more on the agentic features.
The roadmap is as follows:
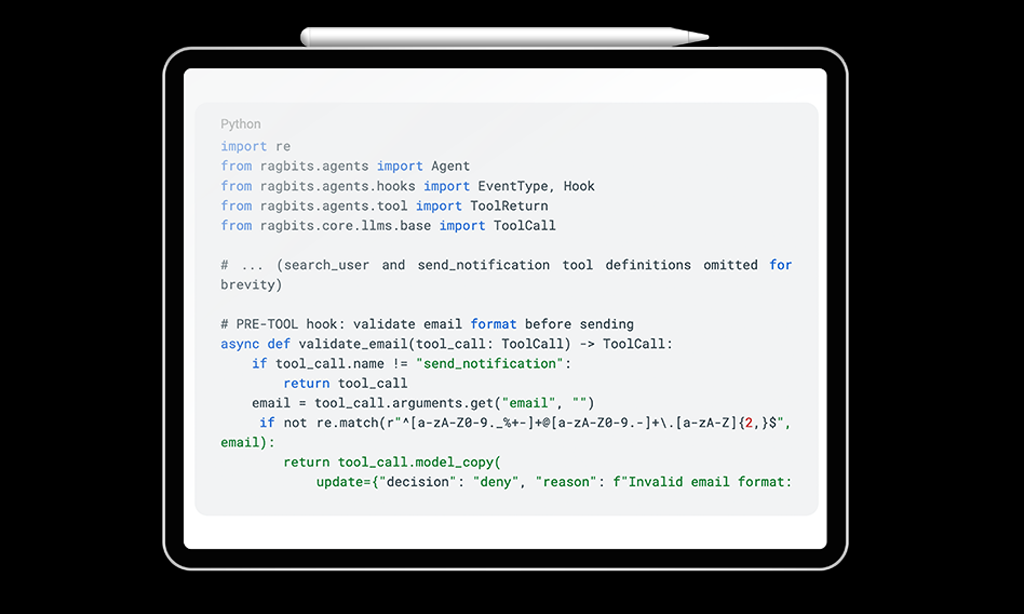
- 1.5. Agent Architecture & Hooks: hooks for agent loop (pre-tool, post-tool, pre-run, post-run), tool confirmation, parallel tool calling, agent as tools
- 1.6. Agent Planning & Memory
- 1.7. Agent Evaluation & Simulation
To see the latest developments in ragbits, check out github.com/deepsense-ai/ragbits. Feel free to reach out and propose new features.