Starting deep learning hands-on: image classification on CIFAR-10
So, you want to start practicing deep learning? I wrote Learning Deep Learning with Keras as a general overview for using neural networks for image classification. It got quite popular. Yet, I think it is missing one crucial element – practical, hands-on exercises. This post tries to bridge that gap.
Practical deep learning
Deep learning has one dirty secret – regardless how much you know, there is always a lot of trial-and-error. You need to test various network architectures, data preprocessing approaches, parameter and optimizers and so on. Even the top deep learning experts cannot just write a neural network, run it and call it a day.
Each time you see a state-of-the-art neural network and ask yourself “why are there 6 convolutional layers?” or “why do they set dropout rate to 0.3?” the answer is they tried various parameters and chose the ones they did on an empirical basis. However, knowledge of other solutions does give us a good starting point. Theoretical knowledge builds an intuition of which ideas are worth trying and which are unlikely to improve a neural network.
A fairly general approach to solving any deep learning problem is:
- use some state-of-the-art architecture for a given class of problems,
- modify it to optimize performance for your particular problem.
Modification goes both with changing its architecture (e.g. the number of layers, adding or removing auxiliary layers like dropout or batch normalization) and tuning its parameters. The only performance measure that matters is the validation score, i.e. if a network trained on one dataset is able to make good predictions on a new one it has never encountered. Everything else boils down to experimentation and tweaking.
I like bringing the example of Right Whale Recognition – a Kaggle competition which our deepsense.ai team won by a large margin. All top teams used convolutional neural networks. I was surprised to see that other winners used very similar architectures (clearly, it was a starting point without which it would be hard to accomplish a lot). The many, many small optimizations we made made a huge difference in the performance of our network.
A good dataset – CIFAR-10 for image classification
Many introductions to image classification with deep learning start with MNIST, a standard dataset of handwritten digits. This is unfortunate. Not only does it not produce a “Wow!” effect or show where deep learning shines, but it also can be solved with shallow machine learning techniques. In this case, plain k-Nearest Neighbors produces more than 97% accuracy (or even 99.5% with some data preprocessing!). Moreover, MNIST is not a typical image dataset – and mastering it is unlikely to teach you transferable skills that would be useful for other classification problems.
“Many good ideas will not work well on MNIST (e.g. batch norm). Inversely[,] many bad ideas may work on MNIST and no[t] transfer to real [computer vision]” – a tweet by François Chollet (creator of Keras).
If you really need to stick with a 28×28 grayscale image dataset, there is notMNIST (A-J letters from strange fonts) and a MNIST-like dataset with fashion products. They are slightly better, and harder. However, I think that there is no excuse for avoiding using actual photos.
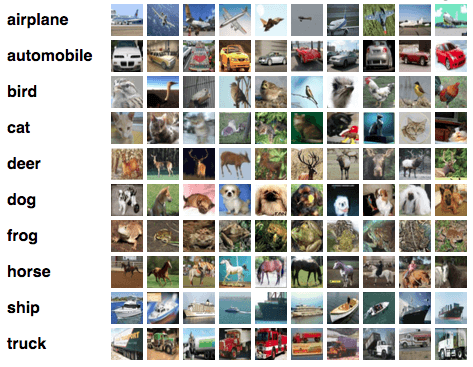
We will work on CIFAR-10, a classic dataset of small color images. It has 60k of 32×32 pixel images, each belonging to one of ten classes. 50k are in the training set (i.e. the one we use to train our neural network) and 10k are in the validation dataset. Have a look at these sample pictures:
Getting our hands dirty
I really encourage you to do the exercises. Sure, it is much faster to just read. But with data science (and programming in general) it matters more how much you write than read. After all, if you want to learn to swim you won’t master it unless you actually dip your toes in the water.
Before we get started:
- Create a Neptune account (we give you $5 for computing, so no worries – this tutorial won’t cost you a cent; you’re not likely to use up more than $5 worth of your credit).
- Clone or copy the repository https://github.com/deepsense-ai/hands-on-deep-learning/ – all scripts we use need to be run from its cifar_image_classification directory.
- On Neptune, click on projects and create a new one – CIFAR-10 (with code: CIF).
The code is in Keras, a high-level Python neural network library. We will use Python 3 and TensorFlow backend. The only Neptune-specific part of this code is logging. If you want to run it on another infrastructure, just change a few lines.
Architectures and blocks (in Keras)
One thing that differentiates deep learning from classical machine learning is its compositional architecture. Instead of using a one-step classifier (be it Logistic Regression, Random Forest or XGBoost) we create a network out of blocks (called layers).
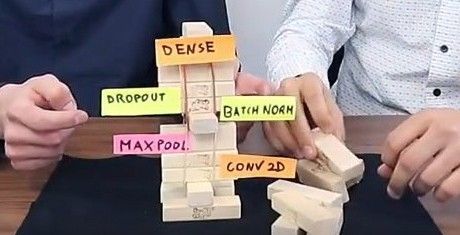
Deep Learning metaphors: ConvNet layers as Jenga blocks
Logistic regression
Let’s start with something simple – a multi-class logistic regression. It is a “shallow” machine learning technique, yet can be expressed in the language of neural networks. Its architecture consists of only one meaningful layer. In Keras, we write the following:
model = Sequential()
model.add(Flatten(input_shape=(32, 32, 3)))
model.add(Dense(10))
model.add(Activation('softmax'))
model.compile(optimizer=’adam’,
              loss='categorical_crossentropy',
              metrics=['accuracy'])
If we want to see step-by-step what happens with our data flow, with respect to dimensions and the number of weights to be optimized, we can use my keras-sequential-ascii script:
           OPERATION           DATA DIMENSIONS   WEIGHTS(N)   WEIGHTS(%)
               Input   #####     32   32    3
             Flatten   ||||| -------------------         0      0.0%
                       #####        3072
               Dense   XXXXX -------------------     30730    100.0%
             softmax   #####          10
The flatten layer just transforms (x, y, channels) into a flat vector of pixel values. The dense layer connects all inputs to all outputs. Softmax then changes real numbers into probabilities.
To run it, just type in the terminal:
$ neptune send lr.py
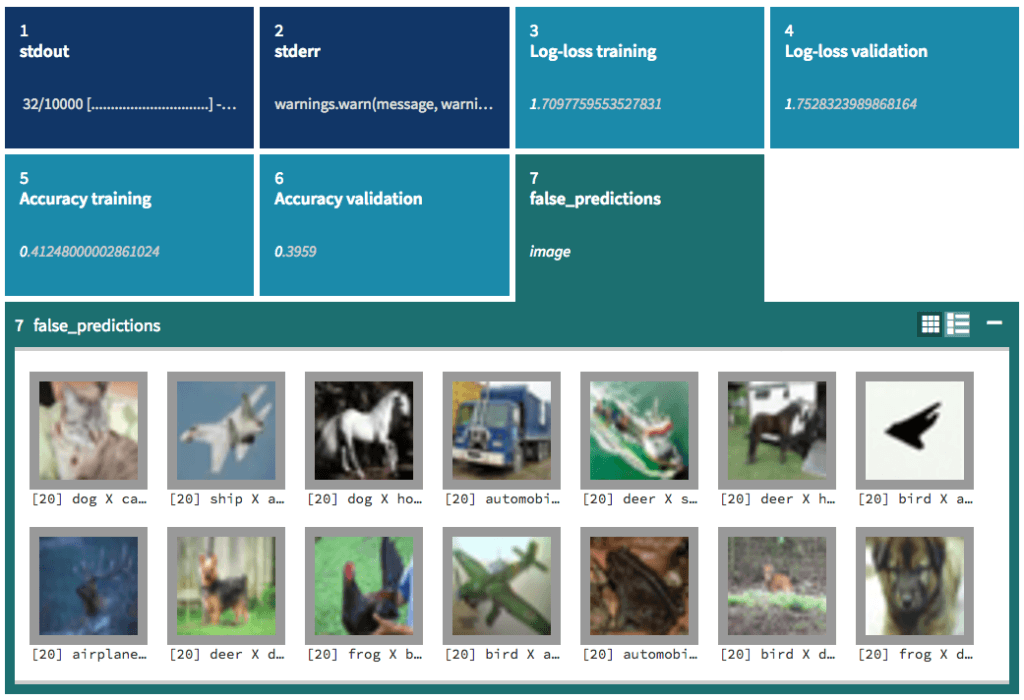
This opens a browser tab in which you can keep track of the training process. You can even look up misclassified images. However, this linear model will look mostly for colors and their locations on the image.
The overall score is not impressive. I got 41% accuracy on the training set and, more importantly, 37% on validation. Note that 10% is a baseline for making random guesses.
Multilayer perceptron
Old-school neural networks consist of a few dense layers. Between the layers we need to use an activation function. This function, applied on each component separately, allows us to make it non-linear, capturing much more complex patterns than logistic regression does. The historical approach (motivated by an abstraction of biological neural networks) is to use a sigmoid.
model = Sequential()
model.add(Flatten(input_shape=(32, 32, 3)))
model.add(Dense(128, activation='sigmoid'))
model.add(Dense(128, activation='sigmoid'))
model.add(Dense(10))
model.add(Activation('softmax'))
model.compile(optimizer=adam,
             loss='categorical_crossentropy',
             metrics=['accuracy'])
What does this mean for our data?
          OPERATION           DATA DIMENSIONS   WEIGHTS(N)   WEIGHTS(%)
              Input   #####     32   32    3
            Flatten   ||||| -------------------         0     0.0%
                      #####        3072
              Dense   XXXXX -------------------    393344    95.7%
            sigmoid   #####         128
              Dense   XXXXX -------------------     16512     4.0%
            sigmoid   #####         128
              Dense   XXXXX -------------------      1290     0.3%
            softmax   #####          10
We used two additional (so-called hidden) layers, each with with sigmoid as its activation function. Let’s run it!
$ neptune send mlp.py
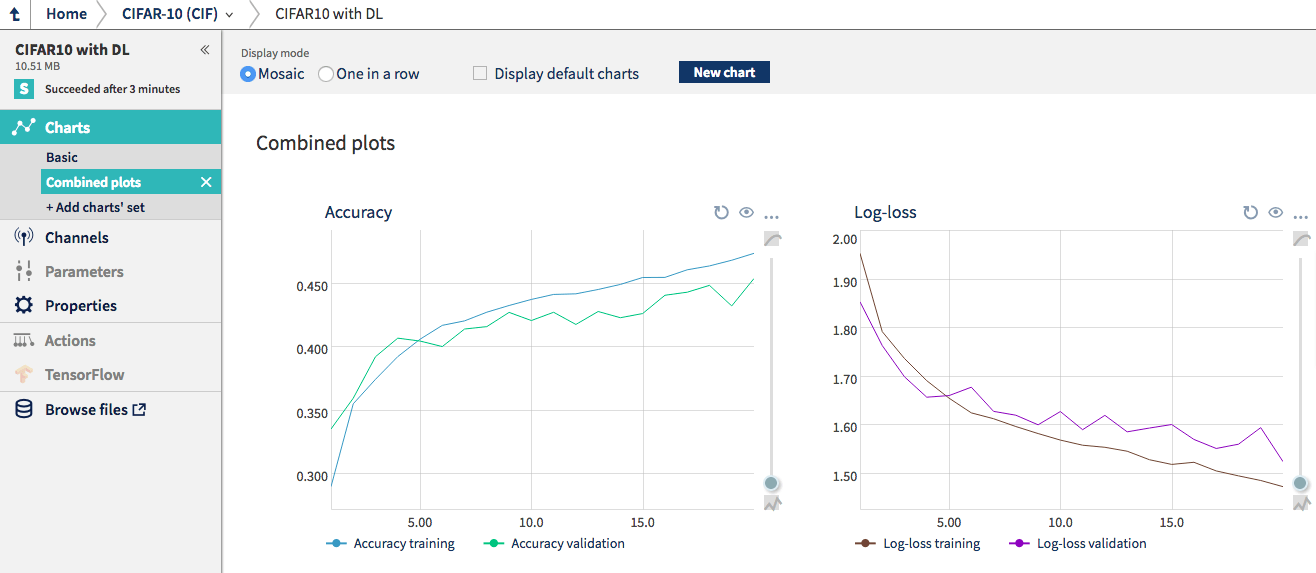
I suggest creating a custom chart combining both training and validation channels on one plot.
In principle, even with a single hidden layer it is possible to approximate any function (see the universal approximation theorem). However, that does not yet mean that it works well in practice, with a finite amount of data. If the hidden layer is too small, it is not able to approximate any function. When it gets too big, the network can easily overfit – i.e. memorize training data, but not be generalizable to other images. Any time your training score goes up at the cost of the validation score, your network overfits.
We can get to around 45% accuracy on the validation set, which is an improvement over logistic regression. Yet we can easily do much better. If you want to play with this kind of network – edit file, run it (I suggest adding –tags my-experiment) in the command line and see if you can do better. Make a few approaches, and see how it goes.
Hints:
- Use more than 20 epochs.
- In practice, neural networks use 2-3 dense layers.
- Make big changes to see a difference. In this case change the hidden layer size by 2x or even 10x.
Just because you should in theory be able to create any picture (or even any photograph) with MS Paint, drawing pixel-by-pixel, it does not mean it will work in practice. We need to take advantage of the spatial structure and use a convolutional neural network (often abbreviated as ConvNet or CNN).
Convolutional neural networks
Instead of trying to connect everything with everything, we can process images in a smarter way. Convolution is an operation which performs the same local operation on each part of the image. Some examples of what convolution can do include blurring, amplifying edges or detecting color gradients – see Image Kernels – Visually Explained.
Each convolution layer produces new channels based on those which preceded it. First, we start with 3 channels for red, green and blue (RGB) components. Next, channels get more and more abstract. To get some idea of what is going on, visit How neural networks build up their understanding of images to see patterns that activate subsequent layers – from simple colors and gradients to much more complex patterns.
As we create channels representing various properties of the image, we need to reduce the resolution (usually with max-pooling). Also, modern networks typically use ReLU as the activation function as it works much better for deeper models.
model = Sequential()
model.add(Conv2D(32, (3, 3), activation='relu',
                 input_shape=(32, 32, 3)))
model.add(MaxPool2D())
model.add(Conv2D(64, (3, 3), activation='relu'))
model.add(MaxPool2D())
model.add(Flatten())
model.add(Dense(10))
model.add(Activation('softmax'))
model.compile(optimizer='adam',
              loss='categorical_crossentropy',
              metrics=['accuracy'])
Network architecture looks like this:
          OPERATION           DATA DIMENSIONS   WEIGHTS(N)   WEIGHTS(%)
              Input   #####     32   32    3
             Conv2D    |/  -------------------       896     2.1%
               relu   #####     30   30   32
       MaxPooling2D   Y max -------------------         0     0.0%
                      #####     15   15   32
             Conv2D    |/  -------------------     18496    43.6%
               relu   #####     13   13   64
       MaxPooling2D   Y max -------------------         0     0.0%
                      #####      6    6   64
            Flatten   ||||| -------------------         0     0.0%
                      #####        2304
              Dense   XXXXX -------------------     23050    54.3%
            softmax   #####          10
To run it, we type:
$ neptune send cnn_simple.py
Even with this simple neural network we get 70% accuracy on validation. That is much more than we got with logistic regression or a multilayer perceptron!
Now, feel free to experiment.
Hints:
- Play with the number of channels and how they grow.
- Usually 3×3 convolutions work the best; stick to them (and 1×1 convolutions which only mix channels).
- You can have 1-3 convolutional layers before each MaxPool operation.
- Adding a Dense layer may help.
- Between dense layers you can use Dropout, to reduce overfitting (i.e. if you see that training accuracy is higher than validation accuracy).
So, is that it? No! This is only the beginning.
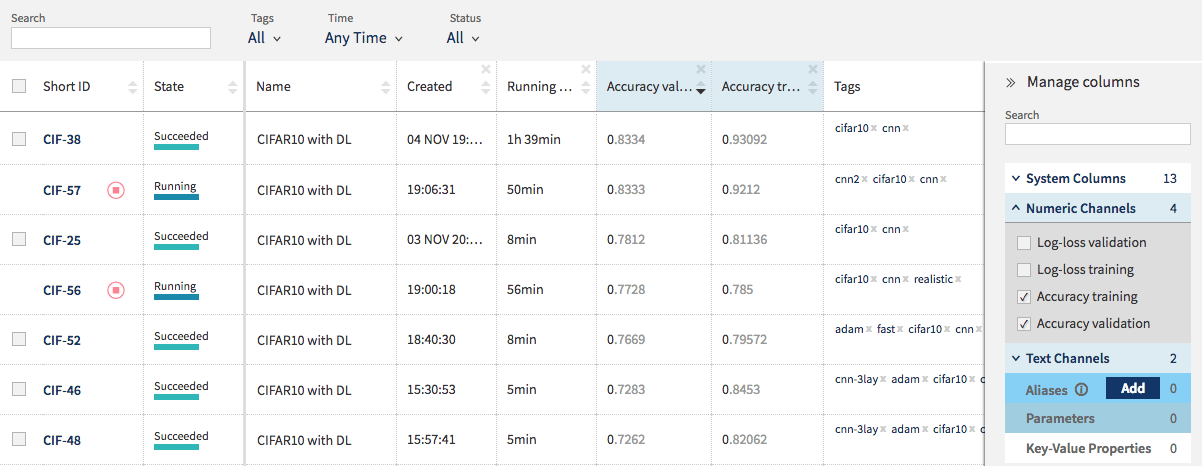
To compare results, click on the project name. You will see the whole list of projects. In Manage columns, tick all accuracy (and possible log-loss) scores. You can order your results using validation accuracy. You get some sort of your own personal Kaggle leaderboard!
In addition to architecture (which is a big deal), optimizers significantly change the accuracy of the overall results. Very often, we get better results by adding more epochs (i.e. the number of times the whole training dataset is processed) and reducing the learning rate at the same time.
For example, try this network I wrote:
          OPERATION           DATA DIMENSIONS   WEIGHTS(N)   WEIGHTS(%)
              Input   #####     32   32    3
             Conv2D    |/  -------------------       896     0.1%
               relu   #####     32   32   32
             Conv2D    |/  -------------------      1056     0.2%
               relu   #####     32   32   32
       MaxPooling2D   Y max -------------------         0     0.0%
                      #####     16   16   32
 BatchNormalization    μ|σ  -------------------       128     0.0%
                      #####     16   16   32
            Dropout    | || -------------------         0     0.0%
                      #####     16   16   32
             Conv2D    |/  -------------------     18496     2.9%
               relu   #####     16   16   64
             Conv2D    |/  -------------------      4160     0.6%
               relu   #####     16   16   64
       MaxPooling2D   Y max -------------------         0     0.0%
                      #####      8    8   64
 BatchNormalization    μ|σ  -------------------       256     0.0%
                      #####      8    8   64
            Dropout    | || -------------------         0     0.0%
                      #####      8    8   64
             Conv2D    |/  -------------------     73856    11.5%
               relu   #####      8    8  128
             Conv2D    |/  -------------------     16512     2.6%
               relu   #####      8    8  128
       MaxPooling2D   Y max -------------------         0     0.0%
                      #####      4    4  128
 BatchNormalization    μ|σ  -------------------       512     0.1%
                      #####      4    4  128
            Dropout    | || -------------------         0     0.0%
                      #####      4    4  128
            Flatten   ||||| -------------------         0     0.0%
                      #####        2048
              Dense   XXXXX -------------------    524544    81.6%
               relu   #####         256
            Dropout    | || -------------------         0     0.0%
                      #####         256
              Dense   XXXXX -------------------      2570     0.4%
            softmax   #####          10
$ neptune send cnn_adv.py
It will take around 0.5h, but the results will be much better. Patience pays off – validation accuracy should be around 83%!
You can try other examples of networks for CIFAR-10: one from the Keras repository (though I had trouble reproducing their score) and one from this blog post. Both of them train in around 1.5h.
$ neptune send cnn_fchollet.py
$ neptune send cnn_pkaur.py
Can you do better? :)
Maybe you can beat 83%? Or create a network which achieves the same goal, but is much simpler? Or one that trains much faster? If you do better, I encourage you to post your validation score in the comments below, with a link to network architecture (e.g. via a link to your GitHub repo or a gist).


